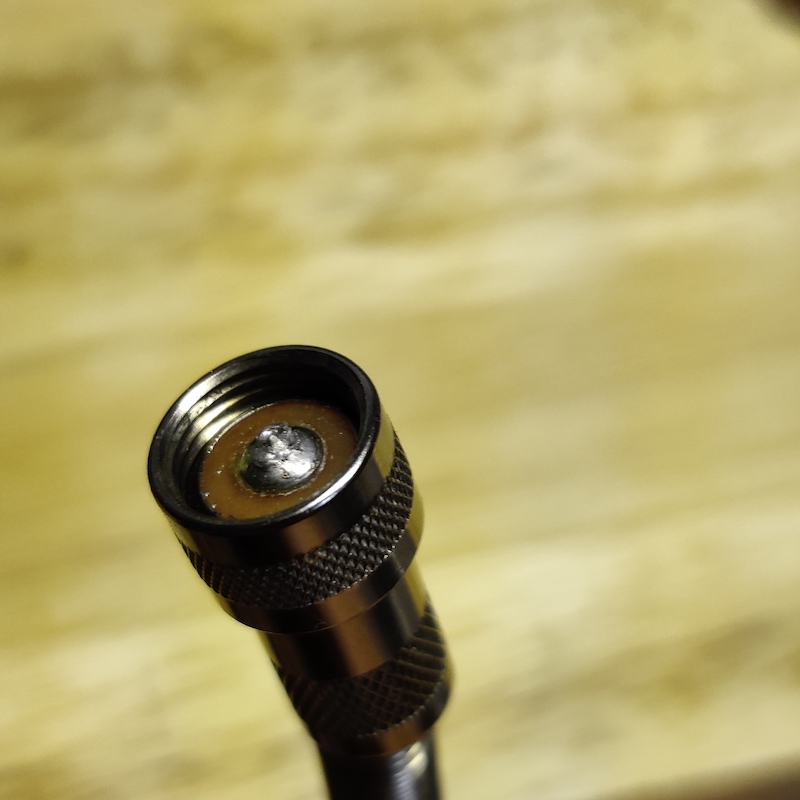
If you’re here you probably just acquired an earlier vintage DeArmond Rhythm Chief (RC1000 or RC1100) archtop guitar pickup, got all excited to plug it in, then looked at the volume/tone control box thought, “huh? what the heck is this weird screwy connector?”
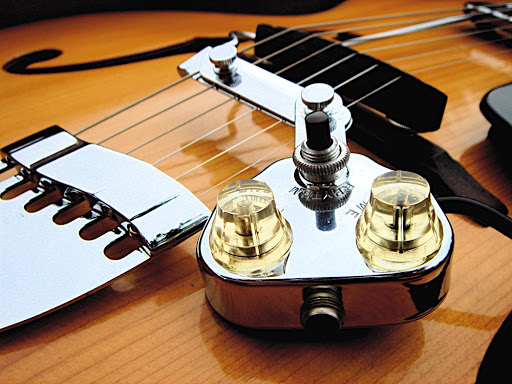
Well I’ll tell you what that is: it’s a very antiquated microphone jack that isn’t really around anymore.
To save you some time, if you want an adapter cable that converts this to a standard 1/4″ output jack, I sell them! Right here.
But if you want to make one yourself, the part number is Switchcraft 5501FX, and you can get them at Mouser, Digikey, or Angela Instruments. You could supply your own guitar cable, chop off one end, and attach this instead. Done.
Well, actually it’s not that simple. It’s a very unconventional connector and not really a “unscrew some stuff, then solder two contacts” sort of affair. But I’ll get to how to install one of those in a bit.
Another option is to just buy the whole dang cable. Archtop.com has them here…. for $49 + shipping. And I see them on Reverb for more or less the same.
Sure, if you’re a busy multi-thousandaire you will probably think nothing of snapping one up, but chances are that you’re a dumpster-diving jazz guitarist wondering if there’s an alternative.
So is there a cheapskate, DIY, stuff-around-the-house solution? Well, as it turns out… yes there is.
The cheapo solution
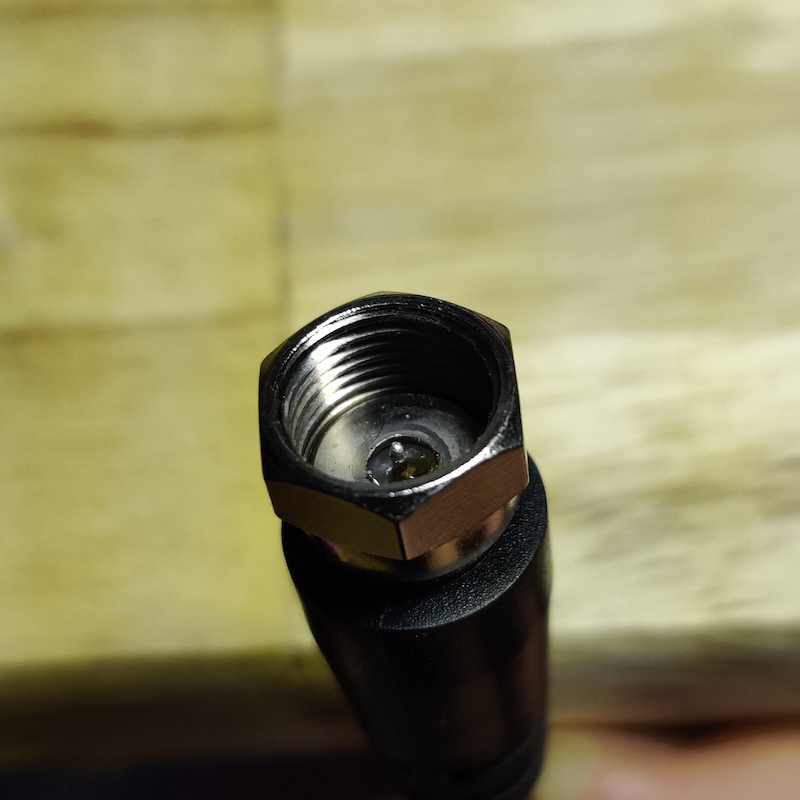
You might think, “gee that thing kinda looks like a coaxial cable… like the kind I use to connect cable to my TV”. And you’d be right… as it so happens those have the same threading of 3/8-32 UNEF-2B.
One tidbit though: the center brass wire coming out of the middle of the cable will be too long, but if you take some wire cutters and snip it to about 3mm or so, it will give enough room to catch the threads.

I also put a little bead of solder on the tip so it wasn’t so pointy and wont dig in to the contact point as much:
I soldered a 1/4″ input jack on the other end of the cable and voila: it worked.

If you do this, keep in mind not all of these cables work the same and some are flakier than others for this purpose. Generally speaking though, I found that the fancy connectors are less effective as they try to isolate the ground/shield connection away from the metal bolt. In fact the cheaper cables make better contact since the whole external metal bit is conductive. Your mileage may vary. Still, not bad for something that only cost a trip to your box of cable spaghetti in the closet (or a free-pile on the sidewalk).
How to solder the proper connector
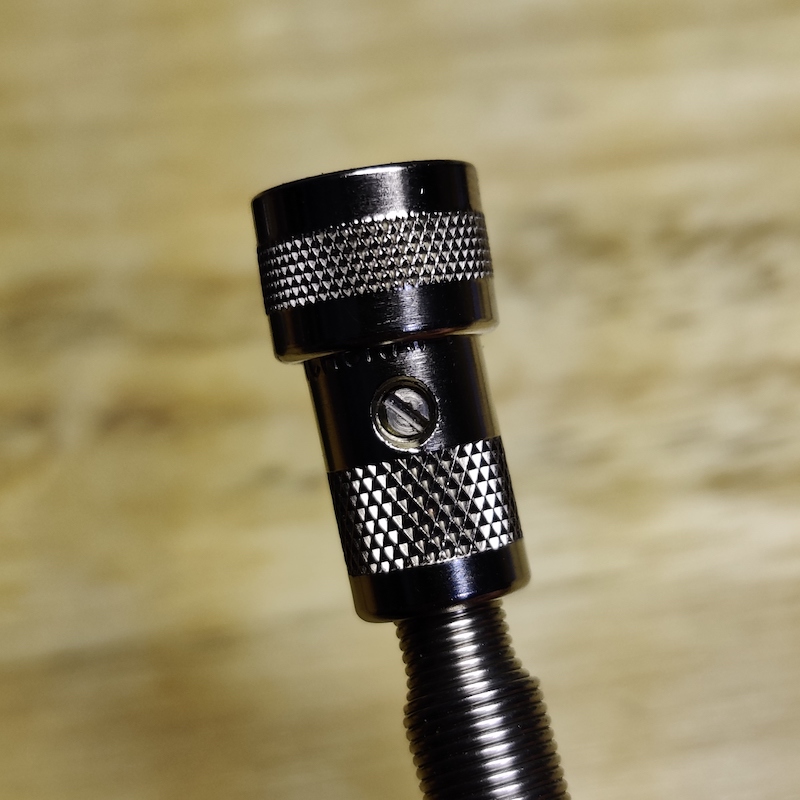
The actual 5501FX connector looks like this:
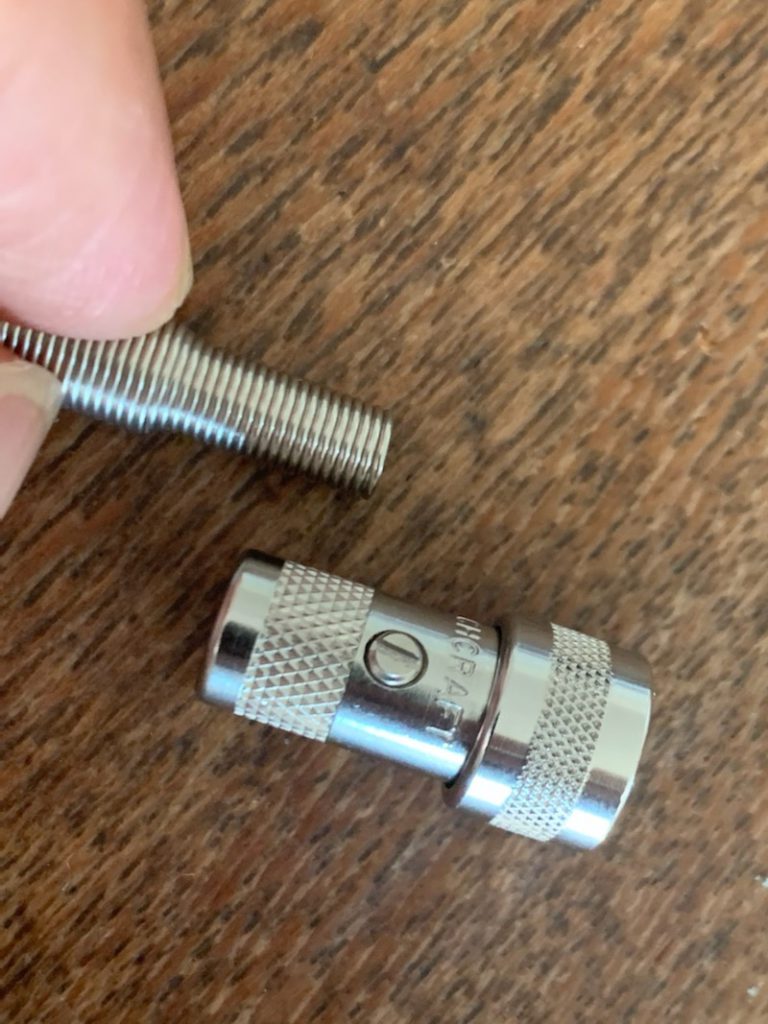
And installing it is not as intuitive as one might think. It’s a real head-scratcher as there are no obvious solder points. The screw in the middle removes the springy cable retainer, but that’s about it. Well a buddy of mine figured it out, thankfully. Here’s the deal:
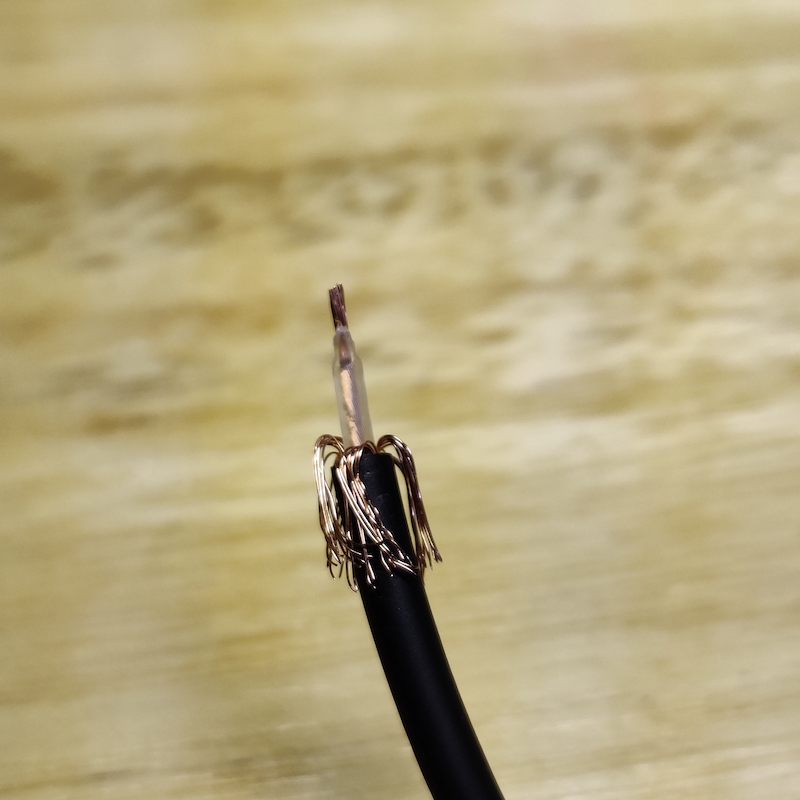
First strip your cable and pull the ground housing down like this:
Next, remove the metal spring retainer from the connector by loosening the middle screw until it releases its grip on the retainer. Now, slip the metal spring over the cable with the narrow side up. Stop and have a look at the rest of the connector through the bottom:

You’re going to want to thread the stripped portion of “hot” interior wire through that hole. Then on the other side, spread the strands of the wire radially over the top of the hole. Then apply a bead of hot solder over it. It should attach the wire to the hole and form a rounded bulge, like so:
So now you’ve got the cable secured by this bead of solder and the loose ground wires hanging out inside the housing of the connector. Slide the spring portion up into the connector like this, and then tighten down the screw:
The spring itself makes the contact with the ground wires and pushes them up against the housing, which apparently is “good enough” as opposed to actually soldering them to anything. The only thing really keeping the cable secured is the little bead of solder on the top. Yup, that’s right. And now you know why these fell out of style…. they are one cable-stomp away from failure. More so, since they are screwed in and unlike an instrument cable wont get unplugged before the damage is done.
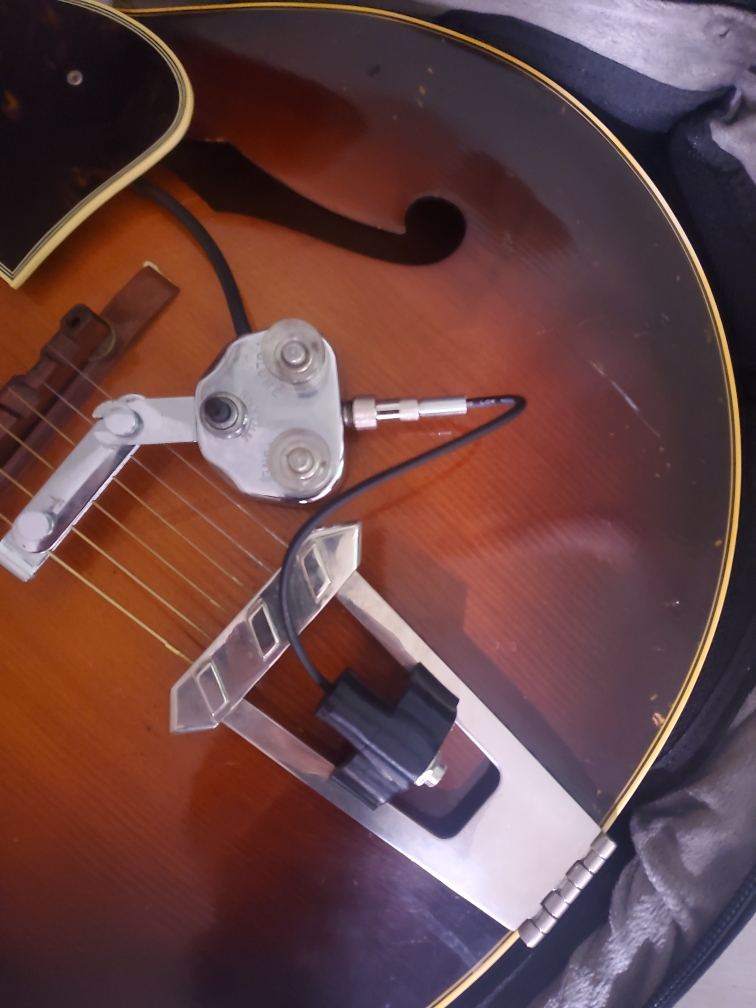
On the other end of the cable, you might consider pairing one of my mounted input jacks, so you can just secure it to the tailpiece, plug in a standard instrument cable, and not mess around with propriety. I sell them on my store. Just sayin….
Fantastic information you have chosen to let the world know about ! Many thanks for that.
I bought a bunch of those Mouser screw-on connectors for a future stash – but they don’t fit as well as original Dearmond screw-on connectors. Not sure if the screw-thread is a little different or something. Must try that other connector you wrote about.
I have altered my screw-on cables, by cutting the cable short, with a combi jack socket / strap button soldered onto the other end of the guitar, fed into the guitar via the F-hole. This way, my screw-on cable is permanently installed – and I just use regular jack-to-jack guitar cables for my guitar. I also have a Dearmond FHC pickup with the Rhythm Chief control box soldered to it, with the same screw-on connector. So, I can change between Rhythm Chief & FHC pickups on my Gibson L50, by just unscrewing the cable and attachment rod, and swapping over the pickups, in a matter of about 2 mins. Anyway, the original Dearmond screw-on cables are quite short on length. By having a permanent install, I can use standard jack-to-jack guitar cables of longer lengths, when needed.
Wouldn’t there be space inside the control box to modernise it by installing a common female jack (the 3.5 TS would be more appropriate probably)?
Yes, I’ve seen this mod done. It’s a little tricky because the old connector is riveted in somehow.
Do you have the mounted jack connector with the DeArmond screw on connector with short cable at one end to screw onto the DeArmond controller and the 1/4” standard jack installed in the box for sale? As shown in the article? I don’t see it in your product list.
No I don’t sell those, you’d need to buy the parts and assemble yourself.
Update: I sell them now. See the links in the article.
Quick questions. I recently bought a RC 1000 but some one removed the rhythm selector switch and placed a rivet over the hole. Was this a practice by some guitarist? Also my clear volume and tone knobs have a screw for removing knob yet I see some clear knobs without screws. Is this a way to date the pickup?
Hi there ! I think the clear lucite knobs with the flat tops (short cylinder) are the earliest type of Rhythm Chief Vol & Tone knobs. Then, I think they switched to taller knobs, with a slight taper, in a more yellow translucent colour – and they feel a bit rubbery, compared to the solid feel clear lucite originals. I think they then switched to the same shape tapered knobs, but in black. My gold Rhythm Chief Model 1100 (with adjustable polepieces) has the black tapered knobs. Maybe the only used black knobs for the gold-plated pickups (and control boxes) ? I think the Rhythm Switch fails often. I’d think a great mod would be to put a mini-toggle switch there instead (if there is room ?).
I fancy buying TWO Rhythm Chiefs and feeding both their cables into the one control box, and having a switch to change pickups, where the Rhythm Switch was. Both pickups could ride along the one attachment rod. How abaout that idea, Vic ?
I have the same Rhythm Switch problem with my RC 1000 (1955)…
Use contact cleaner in the switch; spray it in, generously, and work the switch many times. This will often be enough to get it to work. DO NOT use WD40, it will gum everything up.
I have a fairly old 1000 which I brought back to life. The screw connector has a tab to which the ground shield is soldered (original cable).