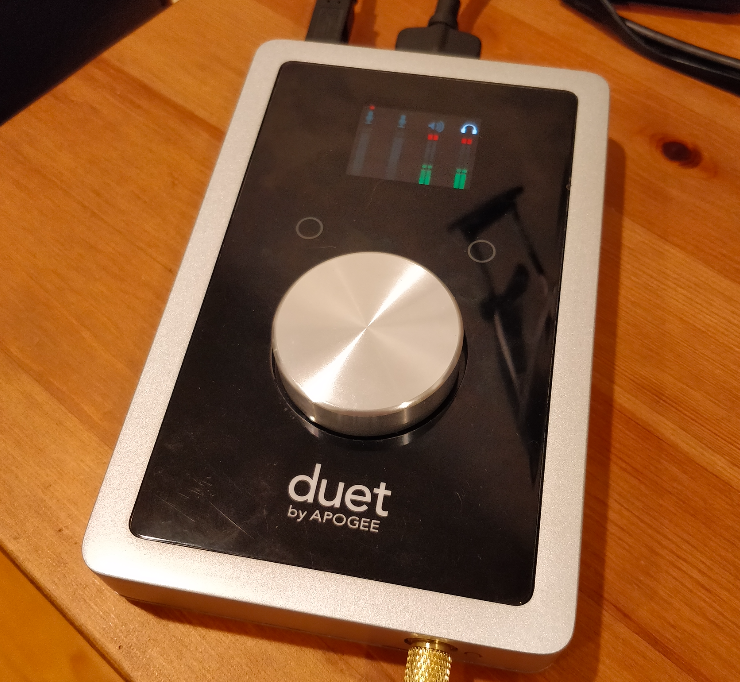
I recently returned from a nice week-long art residency along the northern California coast. My primary goal during this time was to record some solo jazz guitar. Imagine my dismay when I plugged in my Apogee Duet 2 interface on the first night and it didn’t turn on.
After an hour or so furiously swapping cables and downloading drivers, I discovered that it was indeed “working” and being detected by the system. That is, the inputs and outputs of the unit were functional. But the OLED screen that usually showed meter lights and other UI was busted.
Well luckily, you can do most of what you need with this thing in software using Apogee’s “Maestro” drivers and some might agree it’s a better overall UI experience. So I was able to get some recording done that week after all. But of course, the broken-ness of it all got under my skin and I started researching how to fix this out-of-warranty $300 future paperweight.
This guide serves to show you
a.) literally how to fix the OLED screen on an Apogee Duet 2 (I hope google sent you here!) ,and
b.) demonstrate how you, normal person with little-to-no knowledge of electronics can approach fixing your stuff
Can I repair stuff like this? It looks hard
Well, it’s not easy. But I wont say it’s hard.
Thanks to device miniaturization and the rise of board-mounted components, the ability to easily service a device is a dying luxury. Sure you get a compact iPad, but the trade off is you cant change the screen without a heat gun, a ton of patience and a plastic prying tool you never knew existed called a “spudger”. Of course getting professional help is preferred if you can but if you’re out of warranty, then repairs can cost up to or more than replacing it entirely. No thanks, says I, the frugal musician. Plus buying new things has environmental cost. Don’t forget that!
Generally, you can be relatively certain that most electronic gizmos were built with the same pile of Chinese-made components that everyone else has access to. Especially things like sensors, input/output jacks, and yup… screens.
That being the case, if you’ve narrowed down the problem to one of these things, you can replace just that component… usually really cheaply! Big components that receive a lot of wear/use are usually designed to be serviced/replaced and thus attached with large solder joints or detachable cables.
However, if a microscopic board-mounted resistor, capacitor, microchip, or transistor goes bad you’re probably out of luck. Diagnosing and then removing those gets super-advanced and you need really expensive tools. I wouldn’t bother.
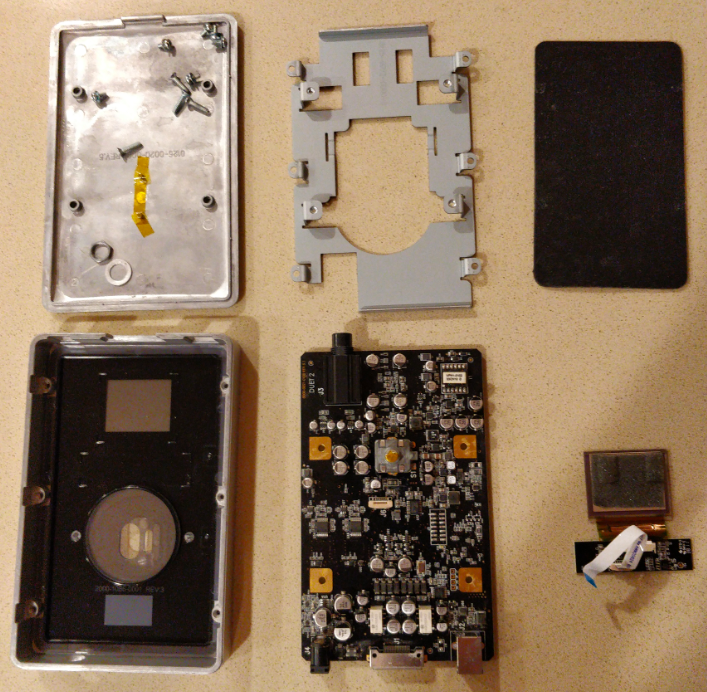
Crack it open
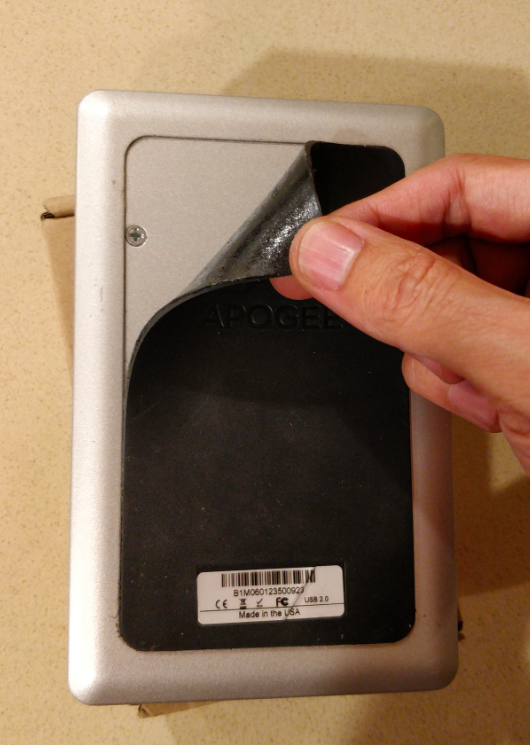
First thing, take it apart. If it looks like your device doesn’t have screws, they are probably just well-hidden. Look for long, deep cavities. They might be in there. Or sometimes if your device has a battery drawer, they can stash some screws in there. Finally, if the device has rubber feet or stickers, peel them back and you might find them there.
Case in point, peel back the rubber mat on the bottom of the Duet 2 and you’ll find them:
Once you find the screws, hopefully they are a standard phillips (cross) or flathead. If they are some weird star shape, you need to buy the right screwdriver (those are usually Torx bits). Also, don’t use a phillips head that is smaller than that of the screw. A screw tip should fit perfectly with no horizontal play. Generally speaking, do NOT try shoving a screwdriver that looks “close enough” into an unfamiliar screw or you’ll really SCREW things up (hah).
Google your device + screws and you’ll probably get the exact bit you need. Or just buy a cheap 63-in-one megapack of device repair bits from Amazon and the whole device-innards world becomes your oyster.
The back panel popped right off, but try as I might I couldn’t pull the circuit board out. This brings up an important point: DON’T FORCE ANYTHING TO OPEN. Usually when it won’t come apart easily, you’re missing some “trick”. Maybe a hidden screw or a retaining tab. In this case, I found that you must remove the volume knob before the board will come out.
The knob, which is allegedly a D-style shaft like you’d see on a volume pot, was as stubborn as they come and I couldn’t pull it out with my fingers alone. I struggled too much with this before realizing I could pry it with two sharp 1mm guitar picks on both sides. Another thing: don’t use metal, like a flathead screwdriver, to pry things or you’ll leave nasty marks and cracks. Guitar picks are great for this sort of thing and I’ve even seen iPad repair kits ship with them.
I positioned the guitar picks like so and levered them on both sides:
After getting the knob off it was clear it had been glued in. Another thing you’ll find: usually manufacturers don’t want you in there. Still, we soldier on. Under the knob was a nut securing the knob shaft to the case. I removed it with a monkey wrench and finally the board came out.
There was ribbon cable running from the main board to a smaller board which had the touch-sensitive buttons and the attached screen. I removed it by pulling up on the small plastic retaining housing to release its grip. Again, don’t just try to yank cables out if they wont go. There’s usually a little housing or tab you pull to release them.
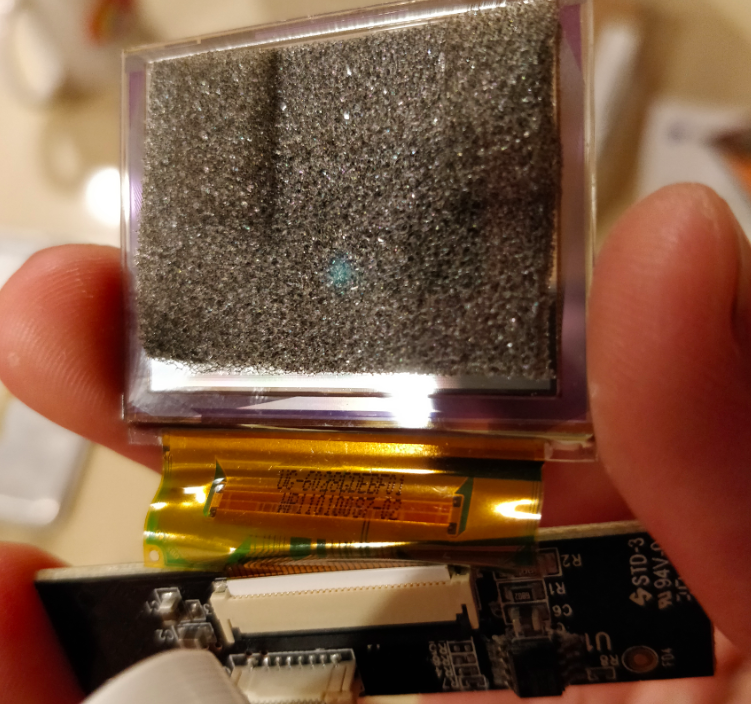
Assessing the damage to the screen
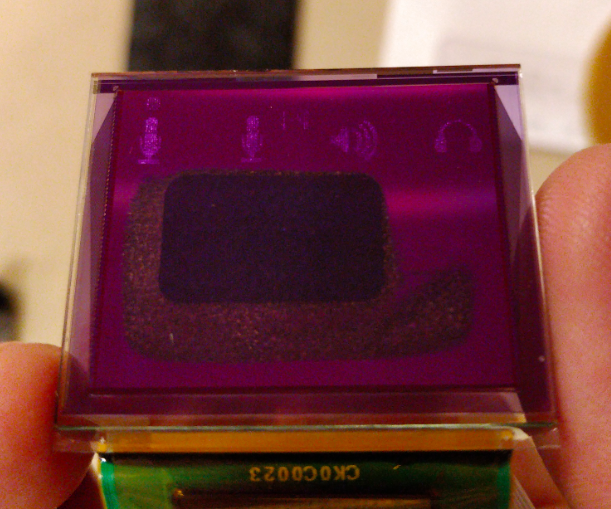
Yeah, that doesn’t look so good. You can see the burn-in from the icons. And the middle of the screen is “melted” away. You can actually see straight through to behind the screen. So I am pretty certain this is the problem. If I replace it, we should be good!
Next, I had to find the part number for this screen. This is the thing you search for to find the replacement. There were lots of numbers all over this thing, most of which came up with nothing on google. However, I kept trying and of course it turned out to be the longest, tiniest, most complex number on there.
Buying the replacement component
Turns out, the screen is an “UG-6028GDEBF01”. Googling turned up some pages with datasheets and even some retailers which is promising. The manufacturer is “WiseChip”.
Alibaba linked a few suppliers that would sell it in single units, and the part cost under $20. Problem is, shipping alone for one of these was $42! Do we have any other options?
A related match on google also turned up the UG-6028GDEBF02, which looks like the next generation of this apparently obsolete screen.

And, thank goodness, Amazon offers this screen right here! (affiliate link)
Comparing some datasheets on the two screens, they have the same amount of pins on the cable, almost identical dimensions (the new one is slightly thinner), and the same operating voltage. The new screen has better specs though, like better contrast and brightness. My perhaps naive guess is that when these manufacturers new hardware revisions out, they prioritize being backwards compatible so as to not totally derail companies that already designed their hardware for the old one. WiseChip’s site provides this somewhat reassuring copy:
WiseChip announced the replacement of full-color product, 1.69 inch which model name is UG-6028GDEBF02 are being substituted for UG-6028GDEBF01 since the fourth quarter of 2010… Undoubtedly, customer can easily adopt the inheritable model, UG-6028GDEBF02, to application device, so that assures customer can be scheduled on time for mass production.
WiseChip marketing guy on Chinese New Year 2011
Sure enough, it worked! Since I already knew how to disassemble the device, installation was a snap. I stuck on a thin layer of scrap foam behind the screen with double-sided tape to protect it from the metal housing, just like the old screen.
In conclusion, you may safely install the $20 WiseChip UG-6028GDEBF02 as a replacement screen for the Apogee Duet 2. Hope that saves you some cash!
Hello there! Thank you for the article. We are on the same train here and I was wondering what screen size exactly I should order? I can’t wait to see the result!
Best of luck!
I ordered the: UG-6028GDEBF02 but you may want to wait to see my future update to see if it’s compatible. The actual part number of the one in the Apogee is UG-6028GDEBF01
There are actually several sizes with the same code so I hope you ordered the right size.
I only see 1.7″ and 1.69″ which are probably the same thing. At least they have the same resolution. Measuring the original screen, it is indeed around 1.7″
Great! I also ordered mine because I saw there is another guy success with same screen attached on Duet. I will also share when I get the part. Best!
screen install successful! The post has been updated
Following your saga from here in Brazil. Looking forward to the update, I have the same problem
I am happy to report that the screen described above worked great!
mine just arrived.. Im very happy…I’ll replace it right now!
It Worked… Thanks!
Hello Icaro, Where did you bought the OLED screen in Brazil?
I’m trying to buy it. I’m from Rio.
Thanks
Conseguiu alguma coisa? achei no AliExpress… mas aquele medo de comprar kkkkk sou de SP
I cant get not available on Amazon now
Did you ever have this disconnecting issue?
https://youtu.be/3FBYaUealmk
I want to know if the Duet has a fuse not. I used a different usb cable the other day (cheap one), the Duet didn’t connect to the mac so I thought I need a DC input. So I used the DC input but I used the wrong one. The adaptor’s output that I used was 12V 2.0A where the adaptor that came with duet was 2000mA 10W LPS. I’m so freaked out now. Someone please help. I’m from Thailand so the my electricity is AC 50Hz 220V if that helps.
Hello! Thanks for the guide… mine is experiencing serious burn in but still working.
Anyway, mine unit has since the day one had a wobbly and crooked knob… do you think it is fixable by removing the knob and tightening the thing? Is the pot shaft “free” and tightened to the chassis or it is PCB mounted and rock solid? Why the knob is wobbly? Thanks!
Yes, if you pop the knob off you can tighten a retaining bolt with a wrench. Very tricky to get the knob off since it’s glued. Use two hard guitar picks on both sides and lever them both upward at the same time. See pics above.
Yes I have seen the pic! I’ll try.. the strange thing is that from your photo the pot seems soldered on the PCB and not wired with free wire, so how is it possible that the knob plus pot get wobbly and the bolt has any effect?
And last question related to the glue and I’ll go to open it up! Did you notice that it is now easy to have the knob detached during travel? Or it still has mechanical resistance when inserted on the pot shaft? Like standard push in knobs?
It is both soldered to the PCB and tightened down with a bolt. In fact, it helps keep the PCB secured to chasis.
You do not need to open the back of the unit to tighten this down.
I haven’t had a problem with the knob popping off after reinstalling. everything seems snug enough.
This is all difficult to explain. You should just try it out.
Update for everyone that reads!
Your method of pulling out the knob with picks is just perfect!
But I had the metal knob detaching from a plastic base first (it is glued) and I had then to remove this black plastic circle from the pot shaft, it slided off and wasn’t glued, I easily put those piece back.
My wobbly and crooked knob was not related to a loose bolt, in fact it was really tight. It is the pot itself being loose and wobbly, you can pull it, it rocks side to side, and spins on a crooked horizontal axis, the metal knob once installed back make this really noticeable!
My unit was like that since the first day, but working fine… so I have to live with this!
DUDE THANK YOU SO MUCH. With your instruction I was able to successfully replace my screen and it works like brand new! only thing I would suggest is to make reiterate that the knob NEEDS to be roomed before removing the circuit. I nearly broke the knob off not realizing this. Thanks again!
glad to help! I actually experienced the same thing when disassembling my device. I have made the fact that you must remove the knob first a bit more clear in the guide.
Thank you sooo much for this.
I replaced the screen unfortunately mine did not work. The touch also doesn’t work so it might be something else other than the screen. The old one didn’t seem damaged. Everything else works but not the display and the touch features.
My screen gave up more than a year ago and I gave up trying to find a fix, until now, thanks for sharing an amazing document on how to repair, I have ordered my screen from Aliexpress and I am looking forward to once again having a working display,(if all goes well), thanks for your great effort in helping many frustrated Duet owners fix their screens.
Thank you sooooo much, bro!
Apogee was asking, I forgot… – but about $400 I think.
Knob wasn’t as scary as I thought. 2(expired) credit cards did the trick!
Boom.
I used players to unscrew the nut.
Some confusion I got was connectors actually.
Bc all of them have 2 types of “locks” and you have to figure out how they work.
And of course I plugged new screen the wrong way… Upside down.
Connector has no problem to ‘except’ plug both way – which creates a confusion.
So be sure you plug it properly.
The blue side of the connector is !not working side.
Than, with out even assembling everything back, I plugged USB to check if ‘picture’ is there.
Than I glued sponge to it and put everything back with new working screen.
Is it hard. No.
Especially when you did it 1000s times in your life.
Thank you again.
Great music!
awesome! I’m so glad you fixed it
Worked like a charm! Thank you thank you! Purchased replacement screen on amazon: https://amzn.to/2WonKCw
That’s awesome!! Thanks for the great info. I’ll update the post since I’m sure people prefer amazon
Any idea if this is the same displays used in the quartet?
Just got my screen from Aliexpress after waiting 2 months, but worth the wait as now I have a working screen again, thanks to Vic
Awesome man! This worked like a charm! I did break off one of the side clips on the screen insert. But outside of that, the brightness is back! thanks so much!
Thank you! Just finished my switch out. For others, one area I could have used a little more info is when unplugging the screen ribbon. I wasn’t sure if that should be pulled out or if there are some clips for that. If there are clips, I didn’t see them after fiddling so I just pulled it out. Next was getting the new screen ribbon it. That was a doozy. I had to fold the green plastic right above the white ribbon so i could pretty that white area into the slot. Seems to have worked well.
Only other think I noticed is 1) I couldn’t get that fuzzy padding from the original to put on the new one. I went without anything. And the plastic between the white ribbon and screen was a bit big for the internal space so in order to get the top and bottom to fit in their slots, I had to fold the green plastic on itself a tad.
Overall I’m stoked, haven’t seen that screen work in over a year. Seeing those VU meters go is niiiiice. Thanks again!
Couple typos above…
“Next was getting the new screen ribbon (in)”
“right above the white ribbon so i could push the white area”
Hey!!
I have an Apogee duet 2 audio interface which is sucks now because I have used a wrong power adaptor with it. Now it is contacting to computer and display is working properly but not giving any output and not taking any input can you repair this I will send this to you via courier.
Sorry, that’s not what I do. The point of the article is that you should crack it open and have a look yourself!
I just had the same issue. I sent it into Apogee. Here is there repair comment”
1 REPAIR FEE: Duet USB/IOS
Repair Lab Notes: 7/24/20…DTAB018170 (with Breakout & USB
Cables) – Confirmed failure. Replaced USB connector-J2 & OLED,
with shipping the cost was a total of $120.
hopes this helps those not able to do this kind of technical work.
clay
Thank you,i am successed to repair my Apogee duet by same way.
I am very refreshing.
Thank you for this! I replaced my screen on the Pro Tools version Duet by Apogee. I got the screen from http://www.first-components.com – the screen in my Duet was the newer UG-6028GDEBF02 version. Shipped from Italy arrived in the UK the next day! Took me about 20 mins to replace and get back in operation. Cost me £39 in all! I can only imagine Apogee charging a few hundred for this replacement.
Hello, Danny
Do you mind showing me how you found the UG-6028GDEBF01 at First Components? I’m in the US but Amazon isn’t carrying the UG-6028GDEBF01 currently and I’d gladly wait for it to ship to fix my beloved Duet 2!
Guys, also is this oleds works with apogee quartet too?? My left oled is gone and right side is about to going :((
My Apogee Quartet is burned out. Have you figure it out if it is the same OLED component?
I was able to fix the broken display on my sons Duet with a spare display from AliExpress. It worked! Display UG-6028GDEBF02, 1,69 inch. Bought from Shenzhen Duoweisi Tech Co., Ltd.
Hi Johansen! Thanks for posting and your feedback
My Apogee Duet 2 started having problems with its display 😔
Have you had success replacing the part you mentioned? Did the display remain as original? thanks