Update! I no longer sell these, sorry 4/29/2020
First, a digression: one of the first things you notice while getting into 3D printing is that it is far from the magic “replicator” of Star Trek, capable of spitting out molecularly-correct cups-of-joe every time. It takes a lot of research, tweaking, and stalking nerdy fellows on YouTube to figure out how to get acceptable quality prints, and even then your stuff will look pretty rough. It’s the nature of the medium… this machine is essentially a hot-glue gun on motors.
As such, I roll my eyes a bit at people who use their 3D printer primarily for making infantile decorative figurines or props. Do you really want to use up all that material, time, electricity, and post-processing hours to produce more useless plastic crap around your house? If this is the trend, future civilizations will no doubt stare in complete bewilderment at landfills full of multi-colored Baby Groots long after we’re gone.
Aww, I know, that’s mean.
Good for you if that’s your bag, but I keep my designs functional and fully understand this stuff is not “production-ready”. They just can’t have the polish necessary to survive the scrutiny of an Amazon review. So 3D printing, to me, is good for small-run niche problem-solving where looks don’t matter.
Once in a while, though, I cook up some design and when I’ve put it all together, I’m surprised that it actually looks good and is functional beyond my expectations.
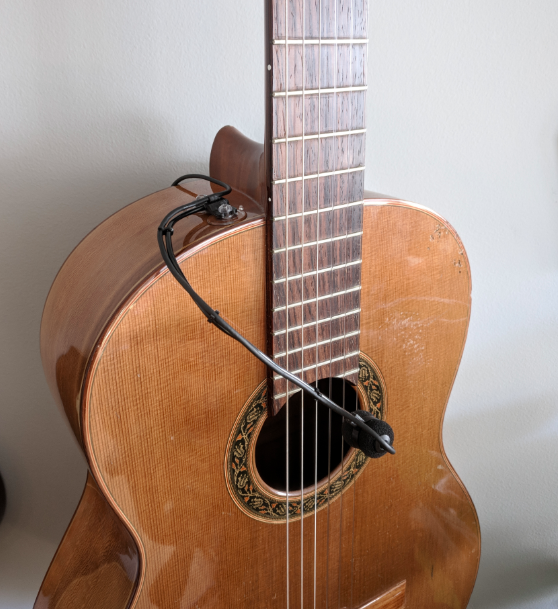
In this case, it was yet another mounting project for Audio Technica instrument microphones, which I use a lot for acoustic guitar (specifically, the Pro 70 or 831b lavalier models). I found myself wanting something that would point the mic to a sound hole or neck position with a gooseneck arm, “DPA-style“. I’ve heard some bad things about the clamping mechanisms on the DPA mounting hardware, so I thought about other ways to attach to a guitar. Why not suction cups? It worked for Nerf!
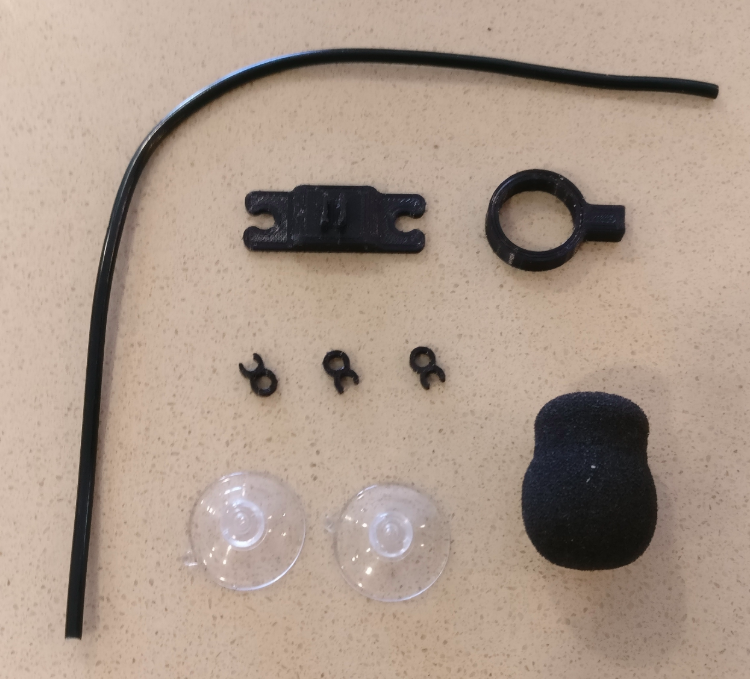
I found some suction cups and hobby wire from the art supply store and whipped up a few prototypes. Here are the parts:
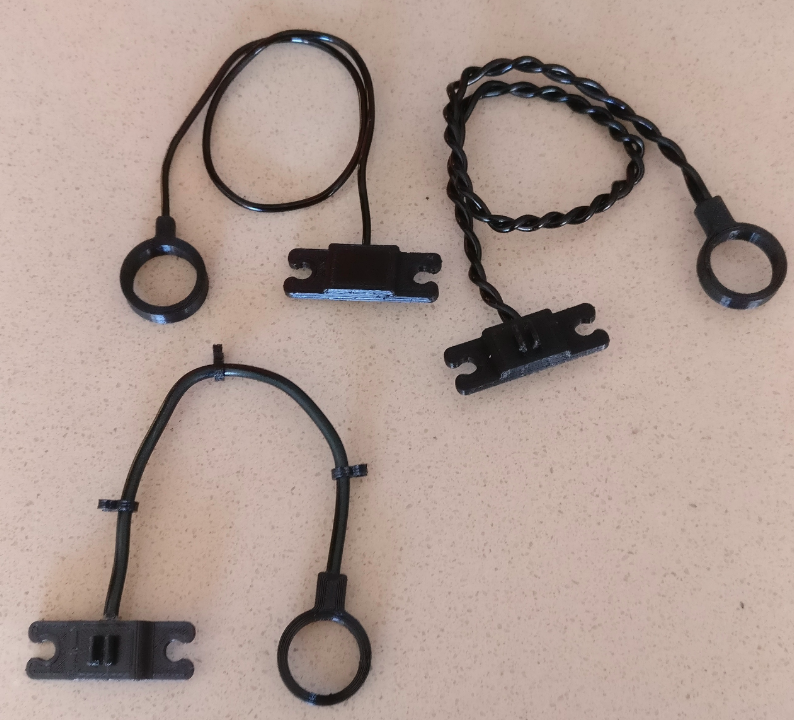
Just to prove that design is iterative, there were a number of misfires. The first problem was the mic would wobble around a lot. The art wire I bought was only about 2mm in diameter and didn’t seem to be rigid enough for the task, even when doubled up in a twisted pair. Eventually, I found the material I needed: black 3mm “bonsai shaping wire”. Digression #2: I love Japan, don’t you?
Also the microphone cable kept getting in the way, so a cable management solution was needed. I added some clips to the base and some that slide onto the wire itself.
Suction cups work surprisingly well on smooth-finish guitars. They are quite secure and easy to remove. However, if the guitar is not shiny, they will not hold… at all. Maaybe if you lick the suction cups, but I’m not going to lick the suction cups. I considered using adhesive putty to attach the base for such instruments, but that also seems like another step that will be a enraging pain in the ass (EPITA) before a gig.
Luckily I had saved some protective screen cover material from my last new mobile phone. This stuff is sticky on the back, but easy to peel off without damage. It’s almost as if it is held on by static. I have used it as a low-rent pickguard solution in the past.
I stuck a small rectangle of it on the non-shiny guitars, and sure enough, the suction holds great, and is not invasive. I’ll probably just keep the little square of material on my gigging guitars and forget about it.
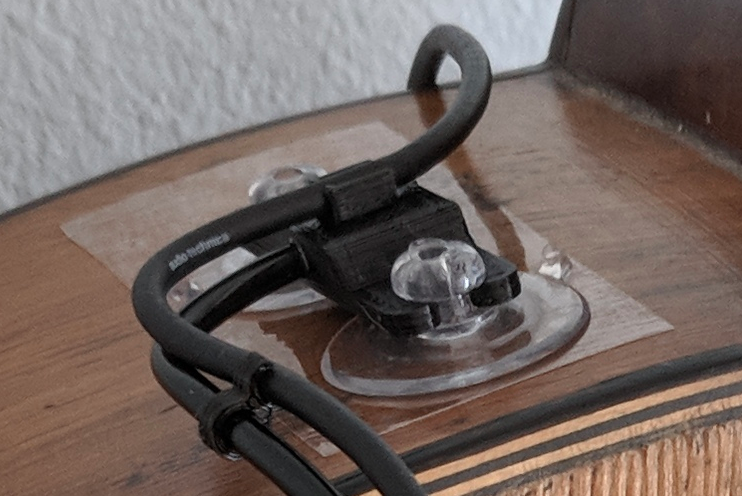
The microphone itself is held in place with the friction from a foam windscreen (got a pack of these off Amazon, common for Xbox gamer headsets). When it’s in there, it really does look like a fancy integrated microphone. See what I mean? Polish!

FWIW, Audio Technica does offer a mount like this called the “Unimount”, but again, it is overpriced. $40! Come TF on. That’s like two 3-hour cafe gigs playing for people staring at laptops (+ tips).
So there you go–subbing out an Audio Technica mic with this sort of mount is much cheaper than a DPA microphone and sounds pretty damn good to my ears. DIY and and being a total cheapskate wins again.
Files and instructions to make your own are up on Thingiverse: https://www.thingiverse.com/thing:3120478
Your a genius. Thanks…
I got as far as knowing I needed a goose neck mic rod. I was also trying to figure out ways to mount speakers to the back of the digital piano. As I said your a genius with the suction cups. I never thought of that. You deserve lots of replies. Thanks for sharing.
Is this no longer on your store? Any way I could buy one from you?
I no longer sell these because further testing revealed that suction cups weren’t reliable. I will update the post
Hi Vic, I found your website out of luck, also looking for a makeshift “gooseneck” for my AT831.
Have you continued working on this project?
For myself, so far I’ve got:
Gooseneck:
Thinking of taking apart a “USB LED lamp” to repurpose its gooseneck. But I am not sure the internal diameter is large enough to house the mic’s cable (I’ll have to cut and resolder its connector). I think routing the cable through the gooseneck is important for visual impact and also to obstruct less of the player’s view.
Guitar mount:
I think I will copy the design of the K&K Meridian mount.
Mic clip:
Your 3D version looks simple and functional enough. Maybe it could be improved to prevent microfonics? or the windscreen already takes care of it?
Best,
Francicso
Hi Francisco, I was offering these for sale for a time, but ultimately decided suction cups were not reliable as a mounting technique. For the gooseneck, I was using 3mm “bonsai training wire”, which works great. I probably have extra and could print you a “kit” with parts minus the suction cup part if you want to get in touch via email.