I’ve brought up IR tech for acoustic guitarists and NAM amp modeling and a lot has changed since then!
I used to think you had to buy an expensive pedal like the Fishman Aura, Nux Optima Air, or Tonedexter for acoustic IRs. There are pricey solutions for loading NAM amp profiles, such as the Dimehead NAM player.
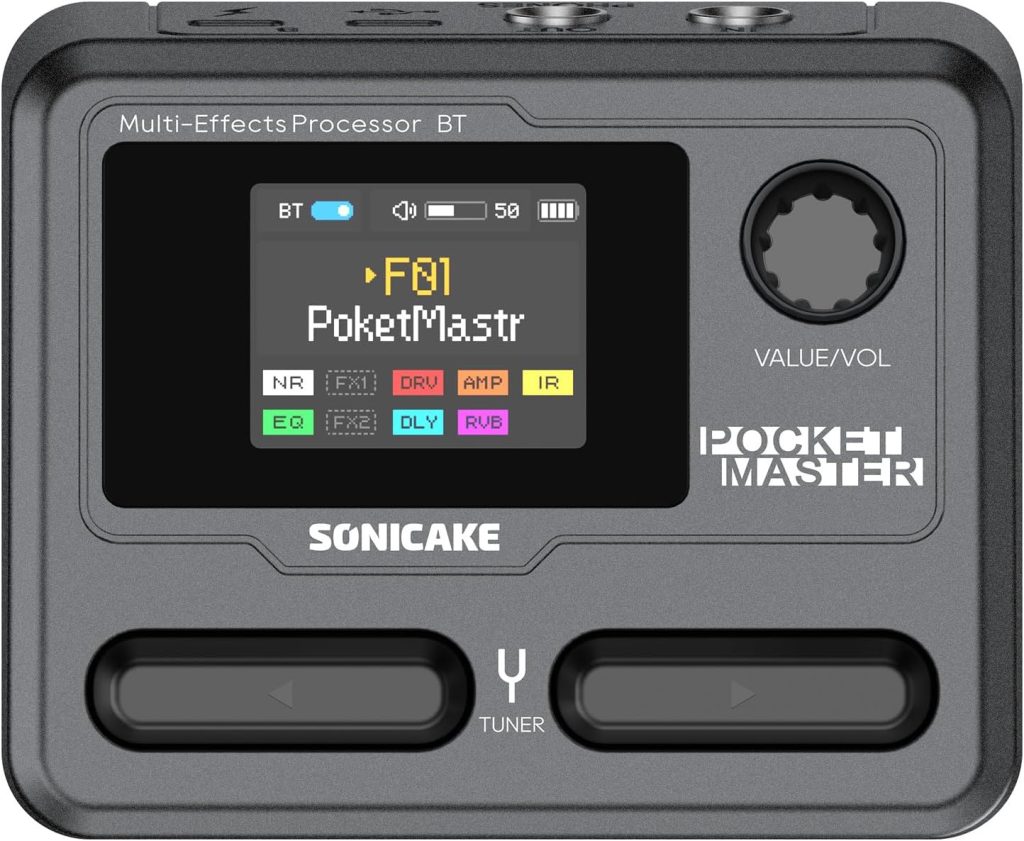
But this tech is starting to make its way into low-cost devices from China. Two such devices are the $65 Sonicake Pocket Master or it’s beefed up big brother the $95 Sonicake Smart Box (affiliate links). I think this thing is a real sleeper. It’s essentially a amp modeler with very decent presets (though mostly for metalheads) and also a multi-effects unit (all the standards: distortion, boost, phaser, flanger, tremolo, delay, reverb) in a very compact, rechargeable battery-powered box:
The onboard stuff is pretty handy, but the most recent firmware for the Pocket Master added up to 5 NAM and 5 IR profiles. So you can load up custom amp models from Tone3000 and your acoustic IR profiles in one box. I’ve been using it to load up an EH-150 amp model for Charlie Christian / Oscar Moore-style archtop playing, and also have a setting for my Gypsy Jazz acoustic guitar IR for acoustic gigs, running into my AER.
I find the internal battery really convenient, because it cuts down on the cable clutter. Also, if I’m feeling really lazy about schlepping amps around town, it sounds surprisingly good running direct into a mixing board. Even my discerning bandmates thought so!
A few tips on using the Pocket Master
Volume issues with loaded models: If you load NAM profiles, go with an older software version 1.1.1, and not 1.3.3+, from Sonicake’s web site. The newest version has issues loaded amp/IR profiles are too quiet. You can sort of get around this by adding some volume boosts to the effects chain (boost, EQ, gain settings), but best to get it in there as loud as possible first.
Loading acoustic IRs: To load an acoustic guitar IR, similarly use the Sonicake Manager app to put them in to one of the five IR slots, which usually are used for Cabinet simulation, but in our case we just want them for acoustic guitar. Then make a new preset where you disable the amp modeler in the effects chain. This essentially makes it a simple acoustic guitar IR loader. You can add additionally add some EQ and reverb to the effects chain to get it closer to the desired sound.
Effects triggers: you might want to be able to easily toggle effects. The M-Vave Chocolate Plus (affiliate link) adds 4 additional configurable buttons that can be set up to do so.
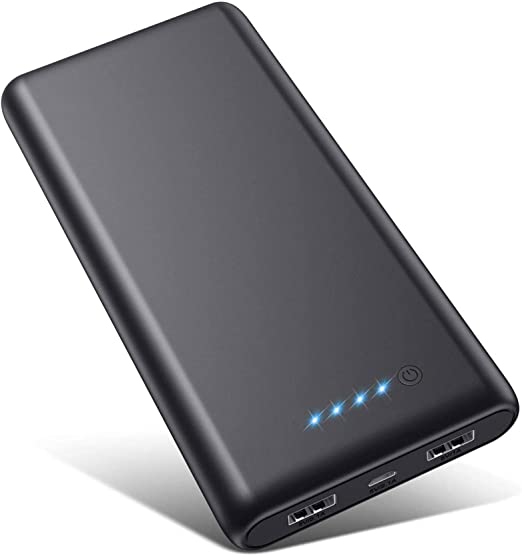
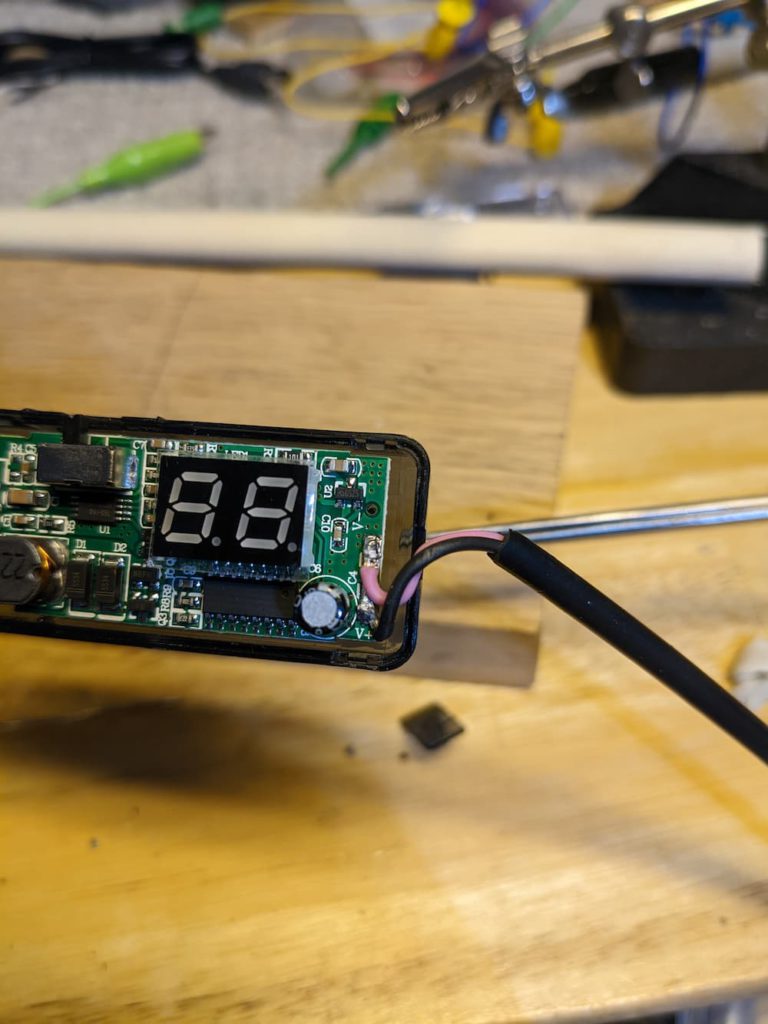
Battery life: If you’re finding the onboard battery a bit lacking (I found that it cuts out around 2.5 hours). You can just use a mobile power bank with USB-C to give it a boost. Also, consider this internal battery upgrade I developed to bump it through a 3-hour gig! Will require a 3d printer. Instructions at Printables.
Note that I’m not shilling for Sonicake at all! I discovered this on my own and I just think it’s crazy what they crammed in this little box. As someone who makes a lot of gadgets to suit my niche purposes, there’s no way I could ever create something that checks all these boxes.
As I have covered before, acoustic guitar IRs can greatly improve the sound of a piezo pickup. They work by converting the EQ of the base pickup sound to that of a microphone using some complicated math.
See this video for some before and after samples:
You can load IRs into fancy, expensive pedals like the Tonedexter, Nux Optima Air, and Fishman Aura, but really anything that can load an IRs does the job. There are plenty of cheaper solutions out there, like the TC Electronic Impulse IR Loader pedal or even the Sonicake Pocket Master.
Using another person’s IRs is probably not ideal since their source pickup and guitar is different. To get the best result you need to record your own guitar, pickup, and microphone. The expensive pedals have the inputs and setup features to handle this for you. But if you go with a cheaper pedal, you’ll need to do it yourself. This means you must supply source audio files of your rig and then process them with some tools like Cuki’s IR Generator to output a wav file that you can load to your hardware. It’s not a simple process at all. But hopefully this guide along with some web-based tools I’ve developed will help.
Recording your acoustic rig
The main requirements for generating an IR file are two recordings:
An audio signal of your acoustic guitar’s pickup
A recording of your acoustic guitar through a microphone of your choice
I recommend recording 60 seconds of playing up and down the neck to capture the full range of your instrument: chords, harmonics, single note scales.
The tricky part is the two recordings need to be playing the exact same performance, so you will need a way to record two channels simultaneously. This can be achieved with a 2-channel recording interface, or a multi-track recorder.
Recording with a recording interface into a DAW
If you have a decent recording interface and computer, plug in the pickup to channel 1, and the microphone into channel 2 of the interface.
Record the 60 second sample on both channels simultaneously into a DAW like Garageband or Audacity. Check to make sure the recording levels are roughly equal on each, and sufficiently loud without clipping.
Once you have the recording, the benefit of using a DAW is that you can further EQ or add some additional processing the to the target microphone track to get the tone exactly how you like it. When you’re done, bounce each track to a separate mono wav file.
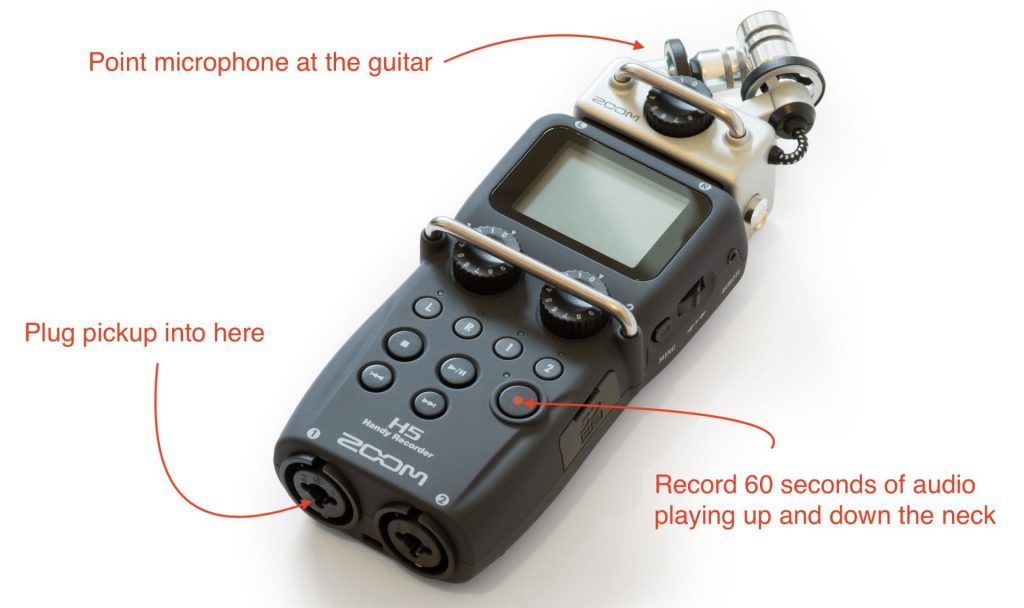
Recording with a standalone multi-track device
I happen to have a Zoom H5 field recorder, which can record multiple tracks at once, so that worked for me. You can even use the onboard microphone. I plugged in the pickup directly to one of the free channels, recorded both the microphone (pointed at the 12th fret) and the pickup.
After recording the 60 second sample, I pulled the two mono wav files off the SD card and was ready to move to the processing step.
Processing the source files into an IR
This is the really difficult part for non-technical folks, but luckily for you I have noticed how clunky the current solutions are and have developed a simple web tool that makes it much easier.
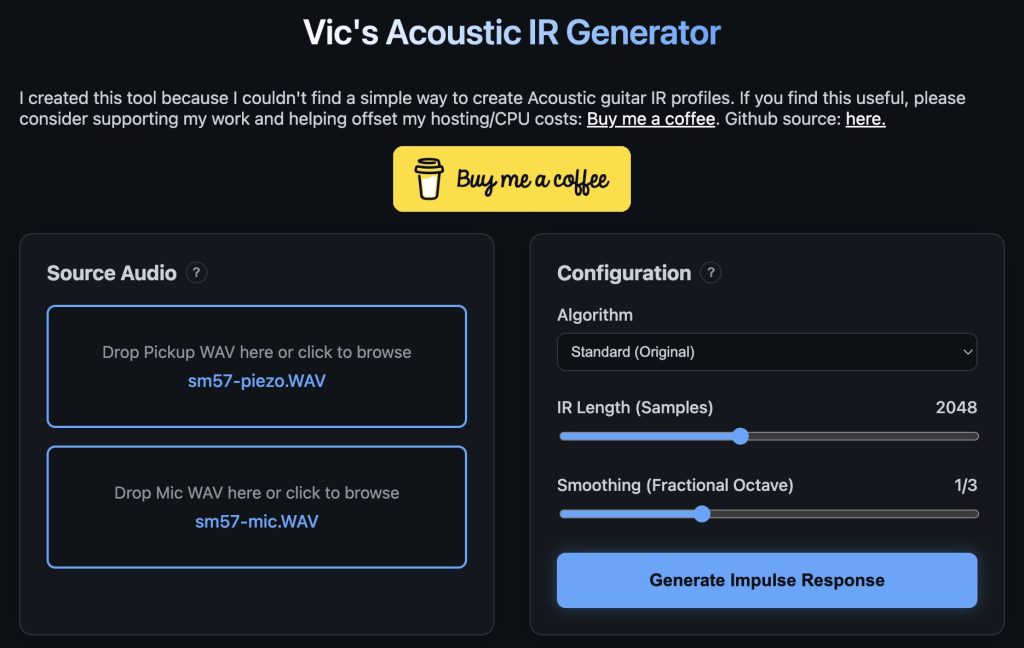
Vic’s IR Generator
Visit this website: Vic’s IR Generator. Note that this site is hosted on a free tier on Render, so might take a bit to load for the first time (50 seconds or so). Once loaded, it looks like this. Drag and drop your two source wav files into the “Source Audio” section like so:
In the “Configuration” section, you can choose either my vibe-coded algorithm “Standard (Original)” or the gold standard “Cuki’s algorithm” from the dropdown. Probably best to leave the other settings alone for now. Then click “Generate Impulse Response”.
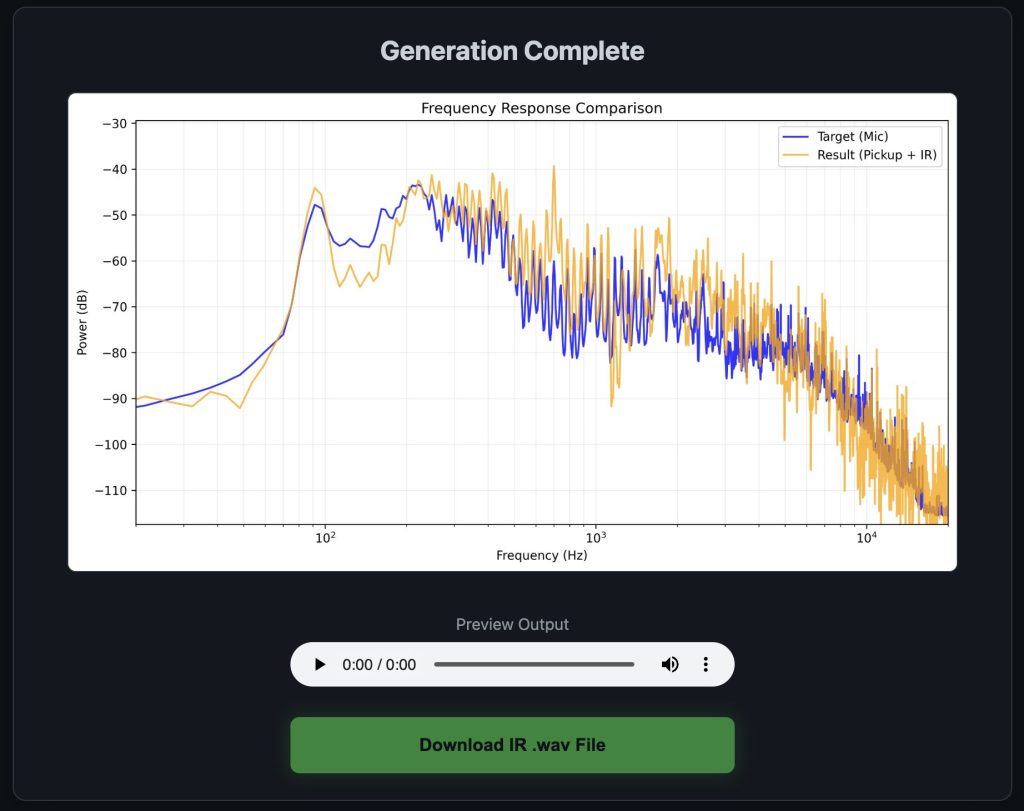
After some time, you’ll get a graph indicating the accuracy of the IR compared to the microphone, and a download link:
The wav file is your IR. It’s sounds like nothing more than a simple “knock” sound, but it includes all the frequency transformation information an IR processor needs to translate the pickup to the microphone sound. Load this file into the IR loader of your choice and give it a spin!
If you don’t like the sound, you can tweak mic placement, mic type (I actually like dynamic mics better), and some EQ in the DAW before sending it to the IR processing tool. Note that “accurate” does not necessarily equate to “sounds good”. Experiment!
A while back I wrote an article about using Impulse Response (IR) technology to model the sound to a microphone on an acoustic guitar and got pretty good results. What I didn’t mention is that same tech is more commonly used to model amps.
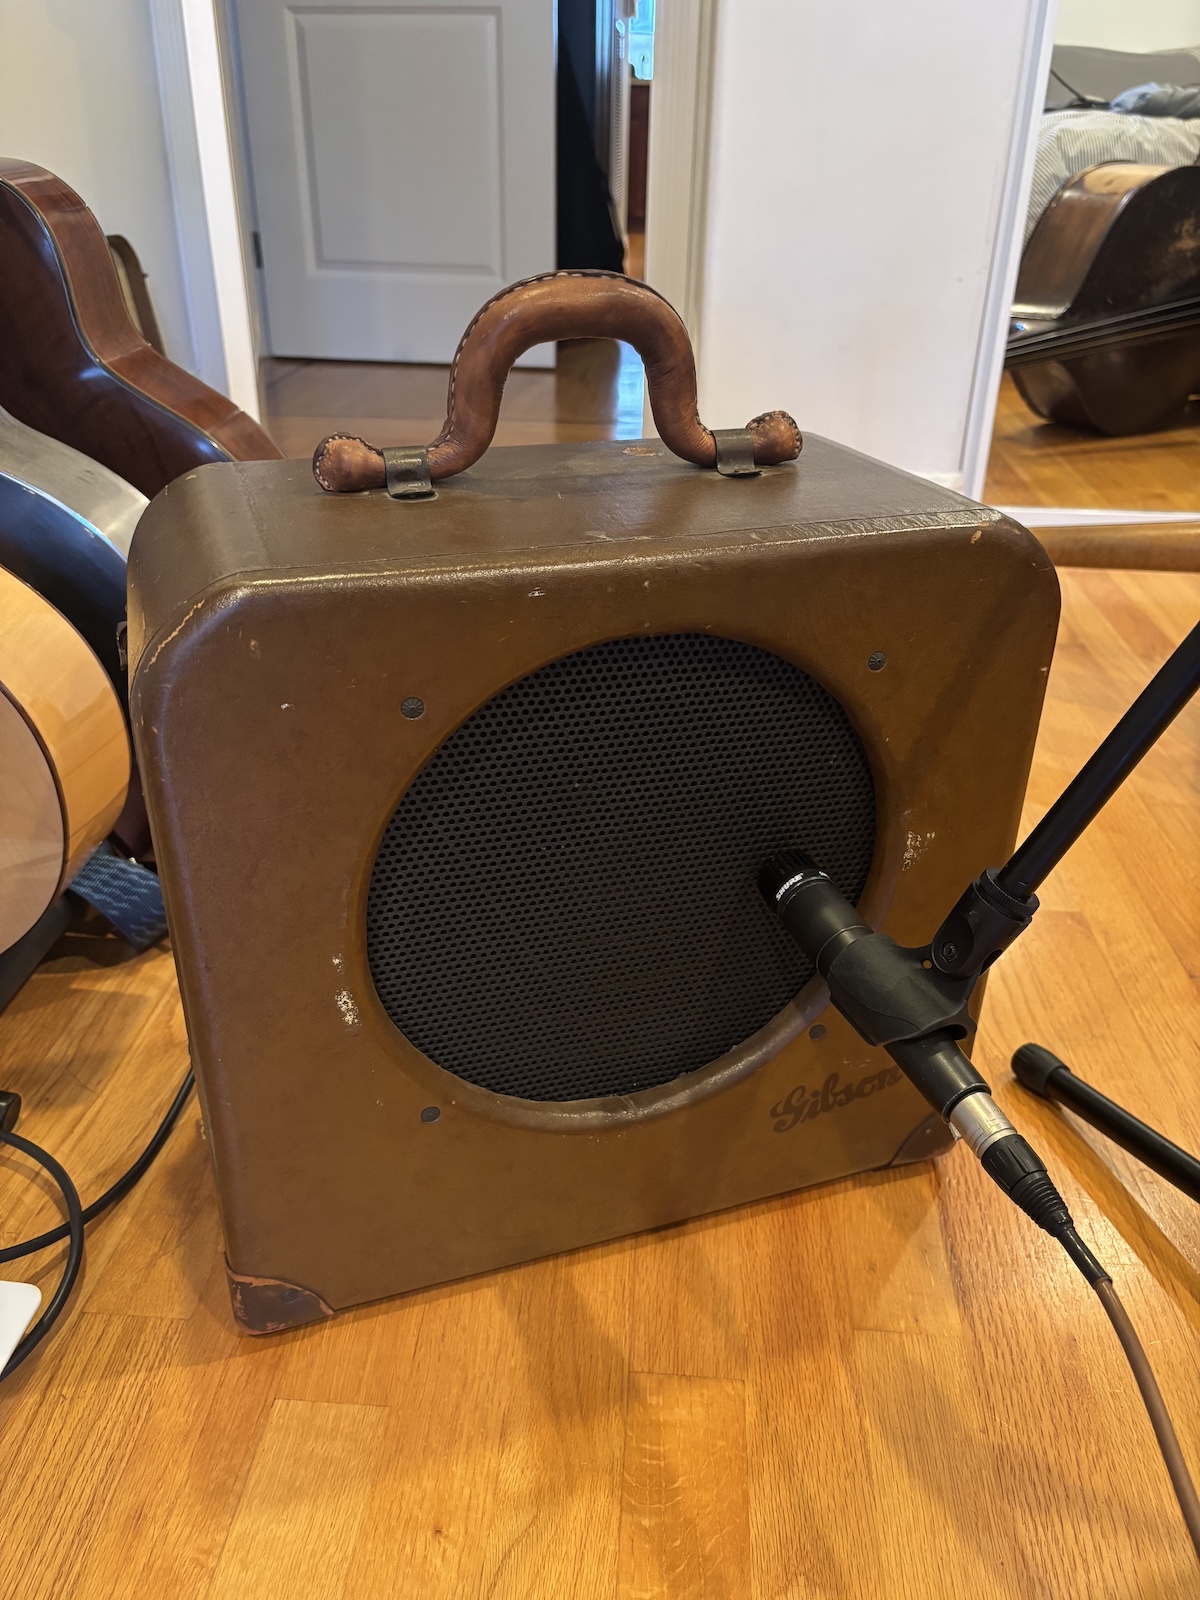
To be honest, I never cared much for that scene, since it seems to be catered more to metal and rock guitar sounds. Since I’m really into 30s and 40s music, the amp tones I’m interested in are more that of Charlie Christian, Barney Kessel, and Oscar Moore. They would play through octal tube amps of the era like the Gibson EH-150 and EH-185 that had a really nice, “wooly” break up to them when digging in. Unfortunately, my lot is pretty niche, and there aren’t any pre-made models of those amps. So I thought I’d finally try modeling one myself.
I don’t have an EH-150/185, but I do happen to have an EH-125 which is a little brother of those amps. So that’s the one I used:
Neural Amp Modeler
The open source project: Neural Amp Modeler has been around for a while now, and seems to have matured greatly over the past couple of years. Best of all, it’s free. You can use it as a standalone app or recording software (DAW) plugin to load models and play guitar through them. There is also a very well made companion site Tone3000 that allows folks to share their own amp models for free download. If it’s a common amp, chances are someone already made a profile for it which saves you a bunch of time trying to do it yourself.
There are good tutorials on how to set up a DAW rig to model an amp, but the gist is:
Download a 3-minute long source audio file that sweeps through a bunch of sound frequencies
Play back that audio file through the amp that you hope to model
Record your amp playing the file with a microphone
Upload both the source file and your recorded file to a neural processing program to generate a profile for the amp with some fancy math
Results
Here are the results with me playing some aimless Charlie Christianish noodling. The same audio file is running through the amp model, and the original amp with a Shure SM57 microphone on it, so there is no variance in the performance.
Actual Gibson EH-125 mic’ed with an SM57:
My “virtual” Gibson EH-125 model, completely digitally recorded using the NAM plugin:
Pretty close! I think the tone is a really good match. But the original does have more of the crunchy wooly sound in the first half with the chordal stuff that seems to have been lost in translation. Not sure how I could make that more accurate. Maybe if I turned up the amp volume or input gain a bit more during the modeling process, it would capture more of the tone. But in some ways I prefer a little less crunch, too.
I found that I really had to push the input volume to get it to break up in a manner similar to the actual amp. But the interesting thing is: I was able to tweak the input gain and EQ after I recorded it to get closer to the break up sound I wanted. Not the case with the real amp. You’re stuck with the input level and resulting distortion you got during recording.
Here’s me playing a full chorus of Rose Room using the NAM model, with me isolating Charlie Christian’s track and trying to match the tone exactly (I found that the treble had to be turned almost all the way up and the bass to about 75% to get in the ballpark).
Use cases
The most obvious use case of this model to me is that I can use it for home recording without pulling my amps out of the closet and mic’ing them up. I can do some late night recording sessions without waking anyone up.
If I went and purchased some kind of pedal that can load NAM profiles, I could load this model into them and use it for live performance. I could see a situation where I’d just run directly into a board in situations where using an amp is not practical.
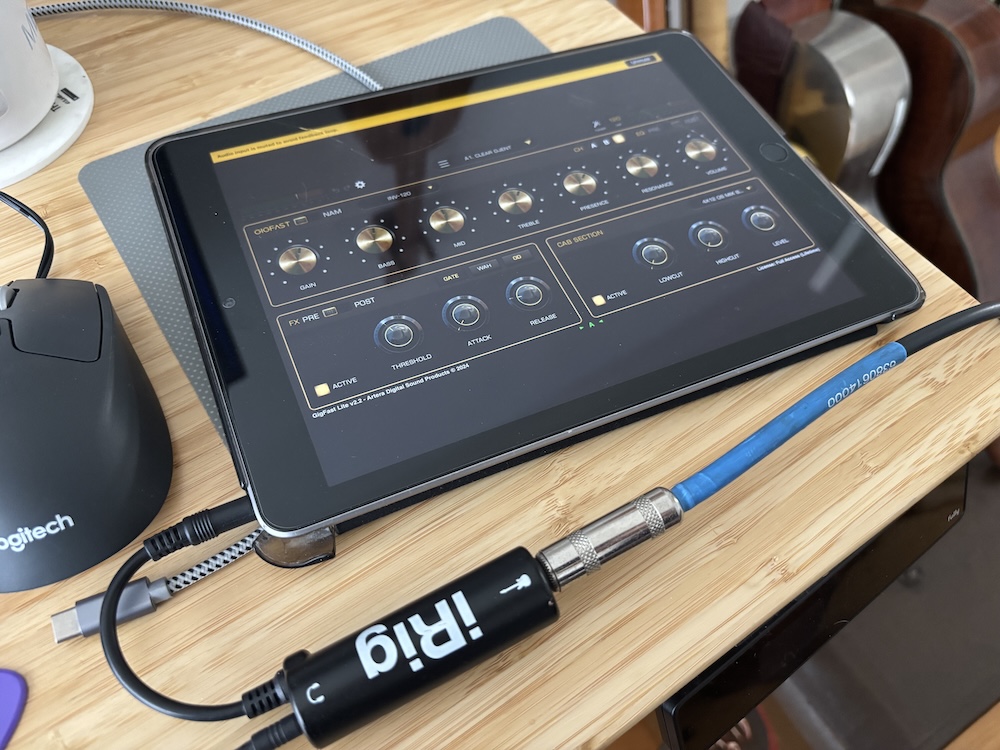
Update: I found that the Gigfast Lite iOS app loads custom NAM profiles. I paired it with one of these very cheap headphone jack guitar input adapters and it works great. It has very low latency and is very flexible, with a very nice spring reverb and tape delay effects. Don’t see the need for more hardware, given I already have my iPad at most gigs.
iPad running GigfastLite with an iRig interface. Headphone out into a PA works great. Charlie Christian tone on the go!
I’d love to model some more relatively obscure amps of the 40s, so if you live near me in San Francisco and want to lend me an EH-150 or EH-185 for an afternoon I’d be thrilled to capture them as well.
Update! Since writing this post, I added a capture of the EH-185 and someone added a great capture of an EH-150!:
Note: I am well aware of and have used the Jr. Barnyard and the JJ-150 pedals. They are fine, but I always wondered if I could get closer to the sound using free software. And the convenience of being able to record direct using plugins is appealing.
Please note: This DIY project is not affiliated with or endorsed by Tone Traveler or DrHerringbone
The Algorithm has been serving me a lot of ads for a product! Well that’s nothing new, but in this case, it’s a device that claims to break-in your guitar and improve its “tone” without going through the often grueling and non-rewarding process of actually playing it. That sure sounds good to me, but it retails for an eyebrow-raising $289, and they even offer a product that is literally called snake oil, if you can believe that.
Like all guitarists, I’m not immune to snake oil, especially if my “tone” (whatever that means) is involved, so I got very curious. Here’s a picture of this thing, and the ad that is now burned into my soul:
Clear you schedule NOW. Your tone depends on it.
Of course, let’s not forget a lot of other things are going on during those years of guitar ownership: it’s hopefully getting played a lot, the wood is aging, stretching/contracting, and if it’s in a heated Queens apartment in the winter, probably dehumidifying and cracking up into a pile of firewood. The question is: can you really expedite all that with a few hours with some magic technology?
It’s probably true that playing a guitar for many years changes its sonic characteristics. My hand-wavy scientific explanation would probably include smart-sounding stuff like “the resonant vibrations of the sound is shaking up the cells in the wood, making the instrument more supple and rich,” and so forth.
So what exactly is this thing?
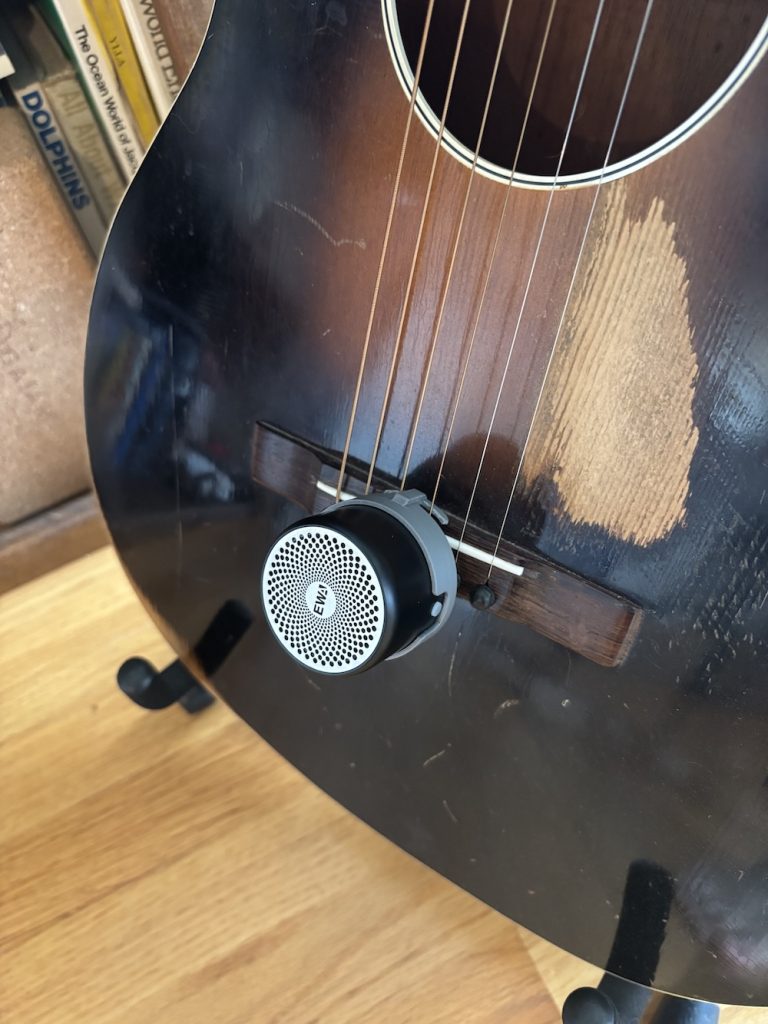
The device in question clips to the bridge of the guitar and emits sounds which will in turn vibrate the guitar. Now I’ve seen a bluetooth speaker before and this thing sure looks like just that. In fact, judging from the logo, it’s probably this one: EWA 106 on Amazon, which can be had for under $20.
There is the matter of hanging it from the bridge of a guitar, but a thick rubberband that I extracted from a head of broccoli and a bent paperclip did the trick. But if you’re a handy, childless person like myself maybe you’d go to the lengths of 3d-modeling a mount that slides right on this particular speaker, like so:
Here’s a link to that 3d model on printables if you want to print it yourself:
There’s also the tone generation. It also comes with a tablet device and a pre-loaded app, which I assume is paired with the speaker out of the box. The app shows a GUI where you can select individual strings of the guitar to generate those notes.
Well, I’ve also seen a tone generator before, and there are plenty of apps that can do this, but the trick is to find one that can do multiple tones at once. This one: NCH Tone Generator seemed to work fine and was free and available for all platforms.
But in case you don’t need more apps in your life, you can also just find a web-browser based tone generator. Here’s one I found that is nice and configurable, I even pre-loaded the URL with all the frequencies of the 6 strings of a guitar, Online Tone Generator. Just click the on/off button next to each tone to get some creamy sine wave robo-guitar. You can look up the frequencies of specific notes and create another set of tones if you try this on your, say, banjo… but please check your local banjo amplification ordinances before proceeding.
Finally, you can also just download the following mp3 file that I created and play it on loop on the device.
The idea here is you’ll bluetooth pair the speaker to a spare phone, tablet, or laptop. Surely you’ve got a drawer with 3 generations of planned-obsolete devices somewhere. Then open one of these tone generators and let it go for a bunch of hours.
The test
The idea of “tone” is so subjective and non-scientific that I’m not sure that recording me playing a guitar before and after this vibration-bath would yield any tangible result. It’s also impossible to ensure that I’d play the exact same way with the exact same volume and mic placement.
That, and maybe I don’t want to obsess over what 30 second snippet I would play that is both demonstrative and sufficiently impressive in case anyone reading is thinking “can this internet guy actually play?”
But here’s one of those sorts of tests if you want to check it out. I skipped to the section where he does the before/after recordings: Jacob Schuler on YouTube.
The folks behind this product devised an experiment where they mic’ed a guitar and ran the device on it for 4 hours, observing a whopping 10b increase in volume over the course of that time period. That seems like as good a test as any to me.
Here is my test rig:
The guitar is a newish washburn parlor guitar from 2008 that I never got too into playing. It sounds nice, but not compared to my vintage instruments. So I thought it would be a good test guitar.
Over the course of the experiment, I would record a short snippet of the guitar and compare the amplitude and visuals sound wave during each of sample time.
Results
Here are the waveforms from the guitar with the “poor man’s tone improver” from the microphone recorded into GarageBand at various intervals in the test:
Test 1: 0 hours, 3 hours, and 11 hours
Test 2: 0 hours, 3 hours, and 8 hours
As you can see in Test 1 there is a visible 2db volume increase the peaks of the wave.
In test 2, there is no significant volume change. Perhaps half a decibel if I squint just right. The dynamic range seems to have increased though, as the distance between the peaks and valleys is higher on the later samples.
Enough “science” what about the “vibe test”?
Playing the guitar, it does feel a bit richer in overtones. Perhaps a bit louder too. But I really think these things are so subjective and can’t say for certain if its anything I can quantify or if it’s just my imagination. Honestly, I think we hear what we want to hear. If I dropped almost $300 on this thing maybe I’d want to hear lots of things.
While I believe my methods are scientifically precise, there is a lot to be said for recording actual music before and after and not just drone tones. I’ll give that experiment a shot when I find the time, but I’ve been too busy… well… actually playing music on my guitar.
Since doing this experiment over a year ago, I have not been compelled to repeat it on any other instruments. In fact I only thought to finally publish this article because someone asked me about it. I imagine if you’re anything like me, the same would happen to you: you’d mess around with it for a week and then would gather dust. The difference is that if you actually bought one, your wallet would be a lot lighter.
My violinist pal Benito Cortez has been showing up to gigs with an Audio Sprockets ToneDexter pedal for years and touting the benefits of impulse response (IR) processing to make lifeless acoustic instrument pickups sound like microphones. While his results sounded good, I always thought the whole rig looked too complicated and expensive. The ToneDexter retails for $449 new.
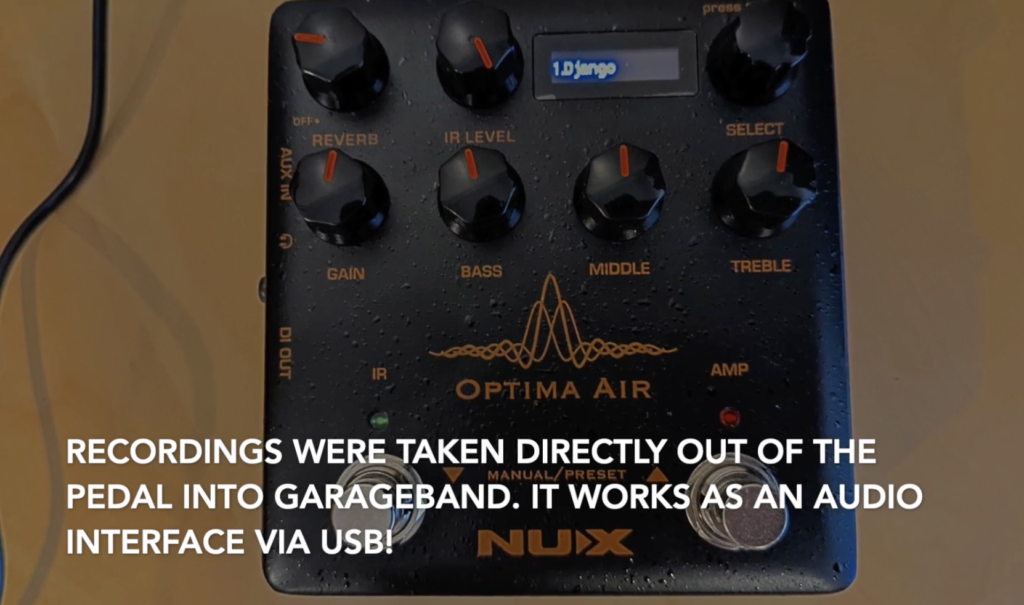
But lately I’ve been experimenting with making my own DIY piezo pickups and trying to find ways to make them sound better, which is exactly what these things claim to do. And it so happens that more of these IR pedals have been hitting the market from different manufacturers including Fishman and L.R. Baggs, which are comparable in pricepoint to the ToneDexter. But a very affordable one also entered the scene: The Nux Optima Air, which is only $179 new. I had to try it.
So how do they work? You attach a microphone to the pedal as well as your piezo pickup. Then you record a 10-second sample strumming chords up and down the neck. This records two samples of the same audio source, one from the pickup and one from the microphone. A frequency profile is generated for each sample and some fancy math figures out how to transform any signal coming from the piezo to match the sound of the microphone’s frequency profile. That’s about it — save your profile and you’re ready to go.
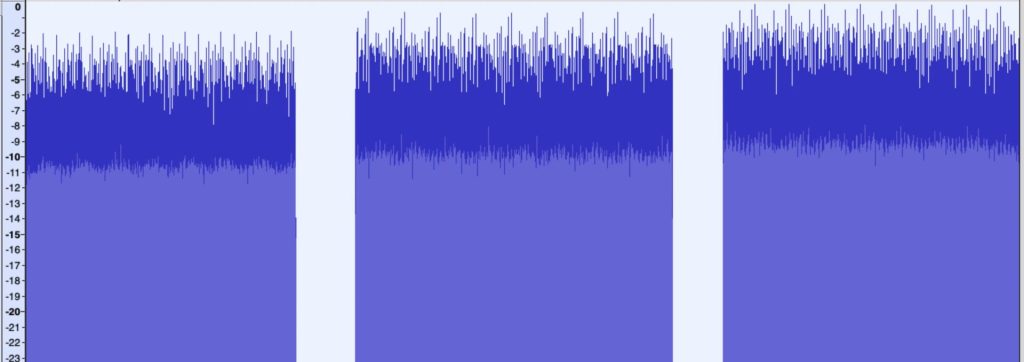
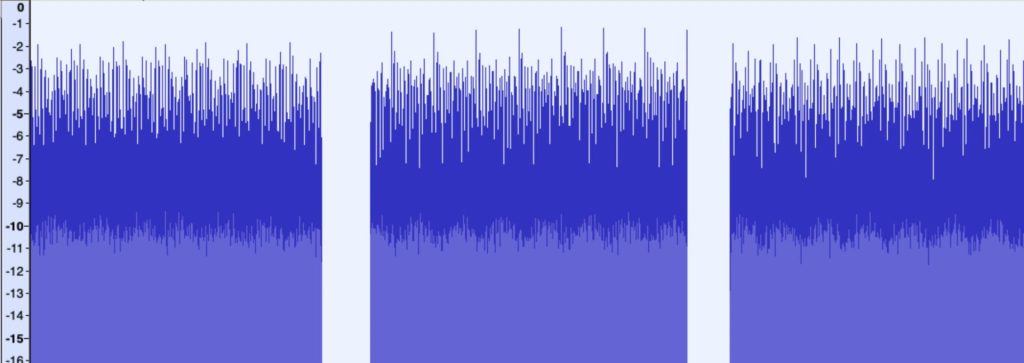
The Nux Optima Air has a USB port that acts as an audio interface so it was simple to record the output of it direct into GarageBand to hear the difference. Most demos I’ve seen are of folks strumming open chords, and my interest is more in using Django Reinhardt-style jazz and acoustic archtop playing.
First I recorded a tune* with the IR switch off:
Straight piezo – two tickets to Duckville
Then I activated the IR effect switch on the pedal:
Nux Optima Air – entering the acoustic tonezone
In short, it actually works. I honestly could have been fooled. The IR effect sounds like a mic’ed guitar to me. There’s none of that piezo “quack”. There’s a fuller warmer sound, with natural sounding harmonics ringing throughout.
There’s a bunch of presets that come with the pedal, but to be honest I think they’re pretty pointless. First of all, they are modeling folk guitars strummers I’m not really interested in (like Gibson Hummingbird / J45, Taylor 314) and secondly there’s no telling what input source pickup they used, where they placed it, and whether it responds even remotely like mine. I think the true benefits to IR are when you model your own exact rig.
I posted a full video of my experimentation with various settings and guitars here:
You may download my IR files here, but your success may vary depending on your pickup and guitar. It’s best to make your own, specific to your pickup:
*The tune is “Clouds” by Walter Donaldson played on Craig Bumgarner Selmer-Macaferri style guitar. A homemmade piezo pickup is affixed just behind the bridge on the treble side of the guitar an inch below the high E string. Both samples were recorded from this piezo direct from the pedal. Some light reverb was added in the mix.
Effects pedals and battery-powered amps are convenient and portable, but they still run off of disposable batteries, usually of the AA or 9V varieties. I sure don’t need to tell you that buying and keeping stock of alkaline batteries is a pain in the ass and expensive. Surely there’s a better way.
You might think: “rechargeable AA/9V batteries! That’s the answer!” But no, no they’re not. Actually, they kind of suck.
Here’s why:
They have lower capacity than regular alkaline batteries.
They degrade in capacity over time.
There’s no way to tell how much charge is left in them.
You need a special appliance to charge them.
They are failure prone. I’ve had lots of them just kick the bucket halfway through their operating life and refuse to charge.
They self-drain. Don’t use your gizmo for 9 months or so? Too bad, the batteries died in there. You should have recharged them right before putting them in which, like, defeats the purpose.
And here’s something you may not have known: They straight up run at the wrong voltage.
On that last point: A rechargeable NiMH AA battery is 1.2V. Alkaline equivalent is 1.5V. That’s a 20% difference in the unfavorable direction. There are 9V rechargeable batteries on the market that run at 7.4V… huh?! That’s not even close.
While most devices have an operating nominal voltage much lower than full capacity, they are optimal at full voltage. And you can bet it will drop below nominal much sooner when you’re running at 20% less to begin with. Further, running at lower voltage for audio gear can lead to lots of nasty distorted sounds that would drive you crazy trying to figure out. I’ve found out the hard way.
Wouldn’t it be nice if you could convert your gear to just plug-in recharge… and have a battery life indicator… and operate much longer between charges… and basically work kinda like… you know, your smartphone?
That last thing got me thinking: what about those portable USB LiPo power banks for charging said smartphones? They have LiPo batteries in them, which is a superior chemistry to NiMH. They last super long and have very low-self discharge. They also have convenient LED battery life indicators on them. And you might already have one.
Only problem, though they operate at 5V. Doesn’t really help with pedals and Roland Cube amps which run at 9V.
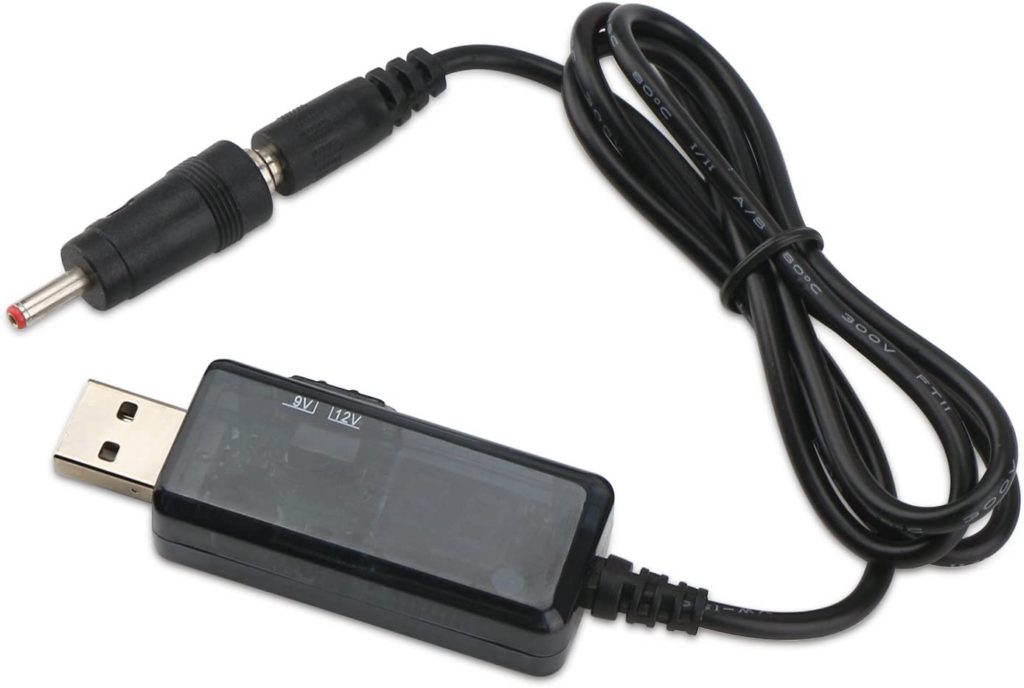
That’s where a step-up converter comes in. I was able to find these on Amazon (affiliate link), which can step up a 5V USB power source to 9V or 12V. Amazing, right? They terminate to a standard barrel connector which would go right into the AC adapter plug in your device.
Another thing, though. The polarity of the AC power input of most pedals and Roland Cube amps is center-negative. How to tell? Look for an icon like this near the AC jack:
The center dot is connected to a “minus” sign. So that means the middle of the AC connector has negative polarity. You’d see a “plus” on the right and “minus” on the left if it was the opposite case.
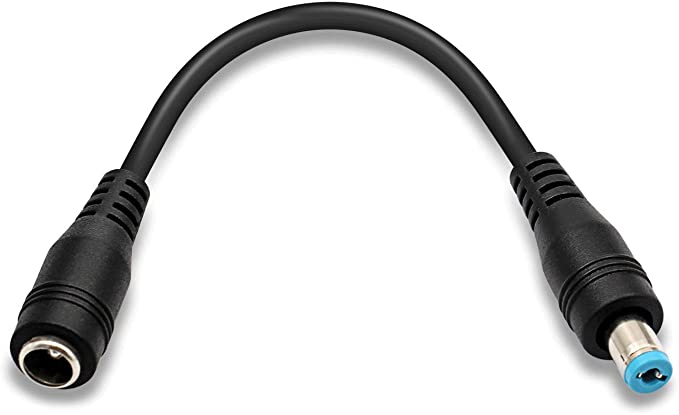
Since this converter’s plug is center positive, so you need to reverse its polarity. If you’re lazy and like spending some extra bucks, you can buy a cable to do this. Looks like this:
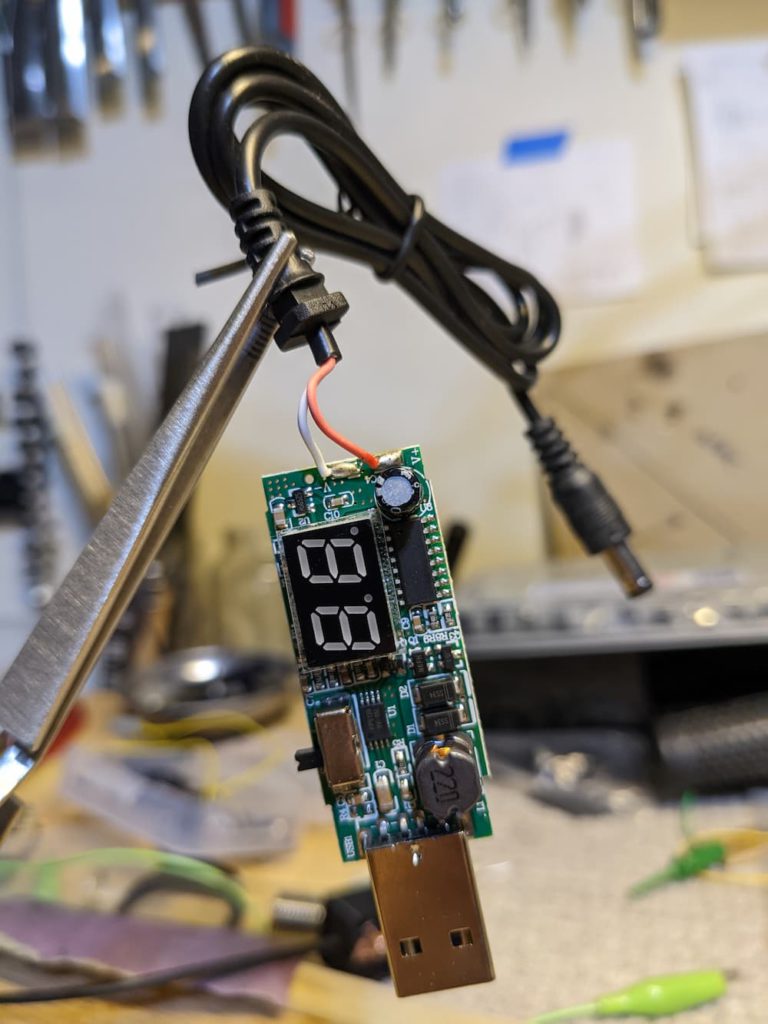
If you’re like me and you don’t want the extra bulk and like to take things apart, you can just pop open the step-up converter casing like this:
Then desolder the red and white leads, and flip them around so the red wire goes to “V-” them, like so:
Note that I used a different, shorter cable, so the GND wire is black, but as long as red goes to V- and GND goes to V+ you’re good to go
There, now the center terminal of the existing connector is negative and you can plug it right into a guitar pedal or 9V amp.
As an extra safety measure, I popped off the plastic switch handle and taped over it to prevent myself from accidentally switching it to 12V. Probably a good idea for you do the same.
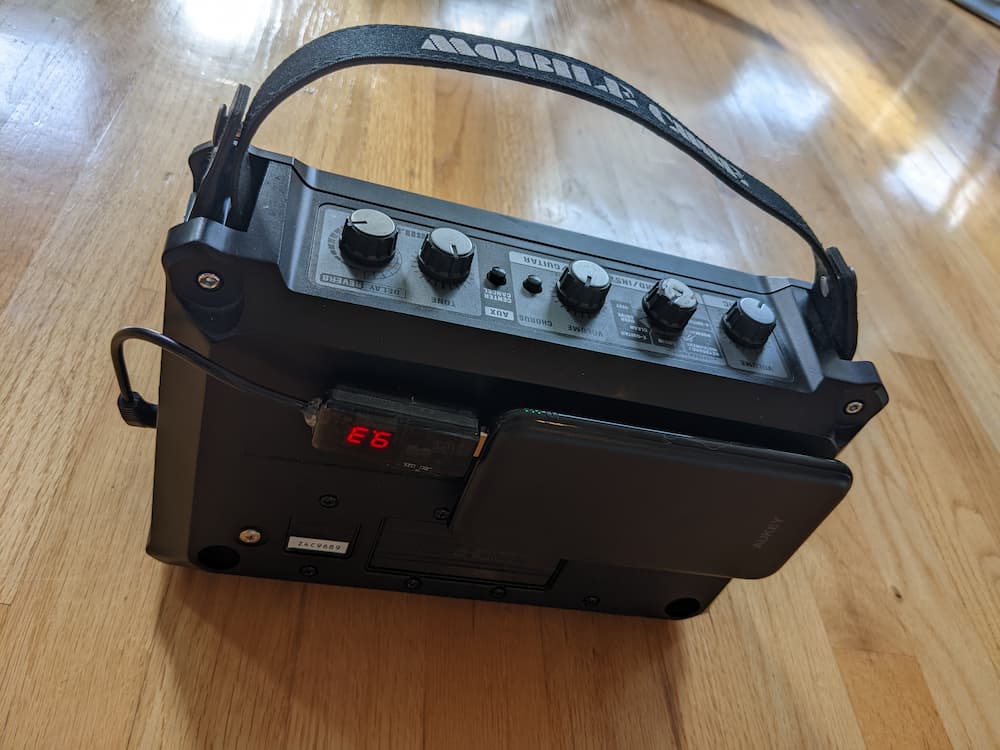
In order to make things more self-contained, I velcro’ed a thin 10000 mA-hour battery (only cost $15) to my Roland Mobile Cube (I may sing the praises of this little lunchbox-sized amp in another post) and installed a shorter right-angle connector to the AC end. I can power this sucker for weeks of operation this way, and at any time check the battery level indicator to know when I should recharge it.
In practice, I rarely have to recharge. 10000 mAh of 5V is equivalent to ~5555 mAh of 9V capacity (10,000 * 5/9). By my estimation, at a rated operating current of 170 mA, it would run this amp for 5555 mAh / 170 mA = 32 hours?! Seems insane. But sure enough I’ve been using this rig casually out and about for 6 months or so and have recharged it maybe once?
Extra lazy and want to spend a little more? You could also skip all this modding nonsense altogether and just get one of these guys:
It’s a rechargeable 4400mAh 9V battery, and comes with all the ports and cables to power up to 7 analog effect pedals, or anything else that runs on 9V. I have one and it works just fine. Though you should make a note of how much rated current your device pulls. If it’s more than 100 mA, you need to plug it into the single port labeled “300mA”.
A question I have found myself asking: “do I, generally low-key jazz guitarist, need a wireless guitar system?” My reply to self was often, “No! Of course not! Those are like for rock guys who jump around and stuff”. That’s not exactly my vibe.
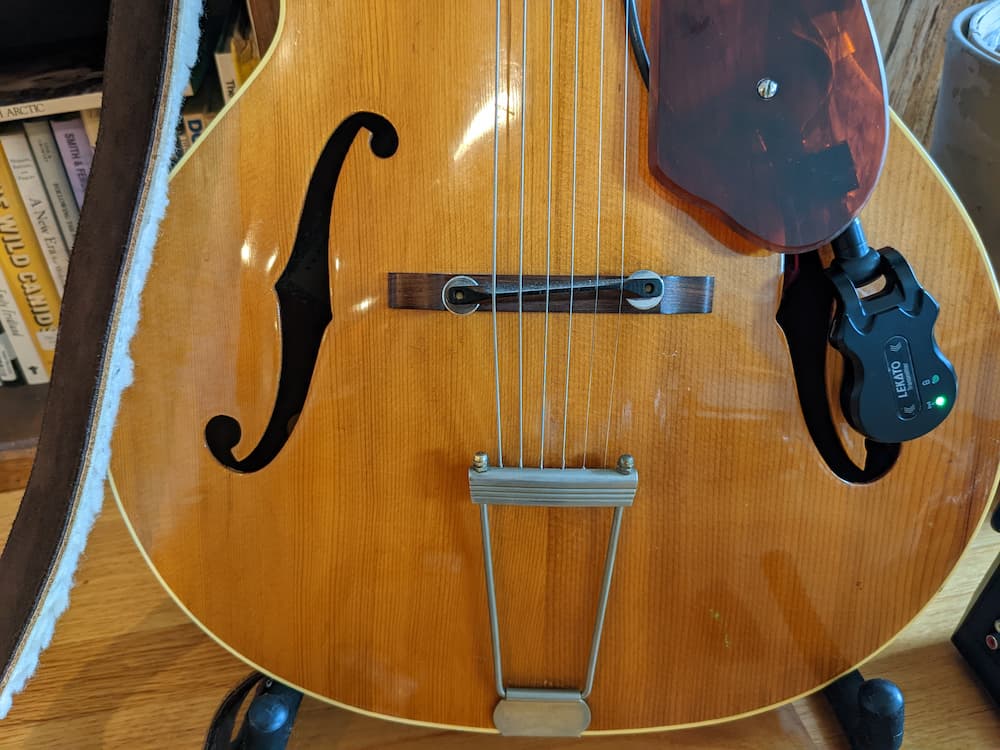
This archtop’s input jack is mounted to the pickguard, a cable stomp could potentially be disastrous. Among other benefits, the wireless system prevents that.
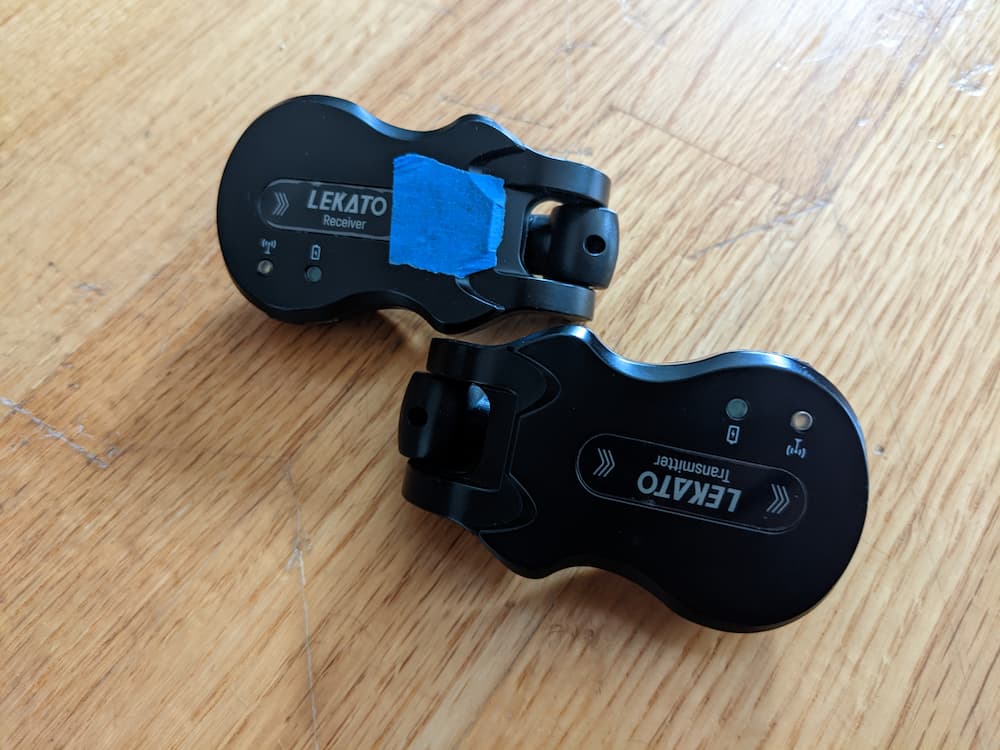
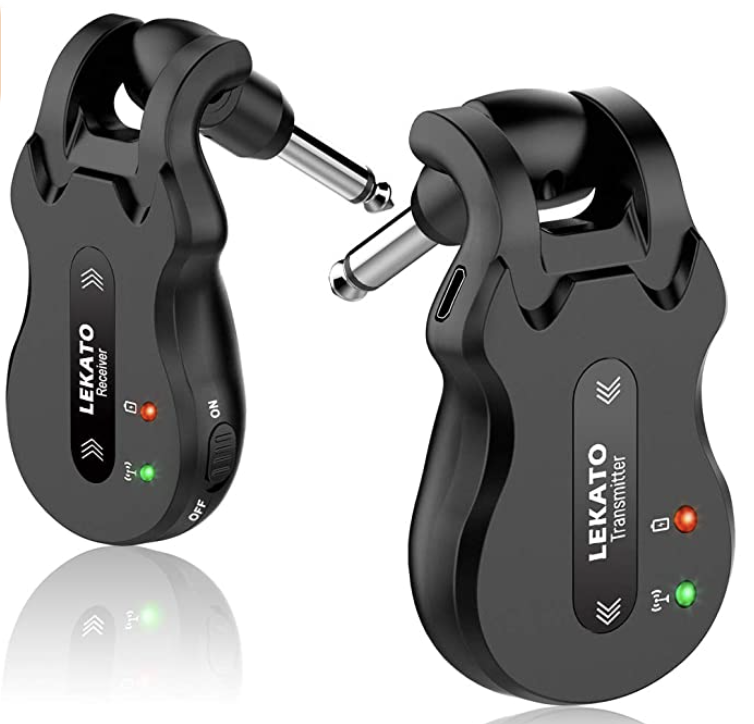
But my curiosity about these gizmos was revitalized when I noticed that they were starting to hit the market for very cheap… like as low as $40 cheap. And what’s more: they are no longer this clumsy, VCR-sized receiver appliance paired with a belt-clipped transmitter box that I remember folks rocking in the late ’90s. Now they are a pair of internal-lipo-battery-powered devices that plug directly in to your amp and guitar. And they’re pretty small–I’ve seen objects dangling from ears that are bigger.
While I’m not jumping around arena stages, I do find myself in very awkward cable situations. I manage a weekly jam session and find myself on my feet shuffling around a lot to rotate musical guests in. It only takes a couple of guitarist sit ins and the floor becomes cable spaghetti. I also sit when I play, and when I get up I have done my fair share of cable stomping, resulting in awful electronic pops at best and busted cables/output jacks at worst.
In the past few years, I’ve seen a couple of acoustic jazz musicians start to show up with these wireless things and sing their praises and I figured it was time (shout out to Duo Gadjo, Alex Fernandez and Jess King). For $50, why not? Some guitar cables cost more than that.
There’s a wide range of these things on Amazon from various Chinese companies with prerequisite nonsense names like “Flamma”, “Getaria”, and “Masingo”. Makes me wonder if they name them by throwing darts at a wall of phonetic sounds.
The various options that might be confusing at first, but the real things to look for are which frequency band they transmit on. There’s three classes of these: 2.4ghz, 5.8ghz, and UHF.
While cheaper overall, 2.4ghz is the same range that wifi broadcasts on, so it’s more likely to get signal interference. I’d stick to the latter two types: 5.8ghz or UHF. But I do know people with 2.4ghz units with no complaints at all, so your mileage may vary.
I ultimately ended up with the 5.8ghz Lekato model (affiliate link). It didn’t exhibit the noise gating*, and I haven’t noticed any issues in terms of connection and interference right out of the box. Sound wise, I can’t detect much of a difference A/Bing these with physical cables. They last about 5 hours on a charge, which is enough for a couple of gigs at least.
It’s been several months with these things and I still use them. Some unexpected benefits:
I can walk out to the audience area and soundcheck the band while playing.
I can easily change positions on stage and communicate with the band without shouting across.
I can put my guitar on a stand without unplugging it (can be difficult with endpin jacks)
Makes unexpected sitting in at a gig super easy. Just hand the receiver to a person with an amp with an extra channel or PA to plug in.
Works great with ukulele, which always feels weighed down by cables.
I can parade around with the tip bucket while taking a solo! (Ok, that was uncharacteristic of me, and it was a pretty wild night at Club Deluxe).
One thing with these is that it’s really hard to tell between the receiver (plugs into the amp) and the transmitter (plugs into the guitar). They look identical, save some tiny text on the front. My “stick a piece of blue tape on it” life hack fixed that problem right quick.
Blue tape = plug this end into the amp, dummy.
Some other issues I have with it, which are mostly not the fault of the device itself, but good to know:
The slider power switch tiny and sort of awkward to toggle. I’d prefer a tactile toggle button.
Can be easy to forget to turn them off to save battery life and you have to do it on both the receiver and transmitter ends.
Makes a pop sound when turned off.
I often forget to unplug them and unknowingly leave it on the guitar when I case it. Thought I had lost one on multiple occasions, it was just plugged in to the guitar.
They have separate micro-USB charge ports. It comes with a Y-cable for charging both simultaneously, but would be cool if they could be attached in series and you could charge them on the go with a cell phone battery and a single cable.
As the player, you’re in the worst position to determine if the battery is about to die, since you can’t really see the unit from behind. Last time I got close to that, my band members pointed out “uh your thing is blinking red”, so they will probably let you know 🙂
*Warning: the first one I bought (on recommendation) was the UHF-based Swiff WS-50. I don’t know if all UHF units do this, but it turned out to cut the volume significantly, and have a horrible noise-cancelling / noise gate effect which absolutely destroying the sustain and dynamics of my instrument. I’m honestly shocked any musician would want to use it and I sent it back immediately. So avoid that one, and be sure to read the bad reviews specifically to see what folks are complaining about.
Update: another colleague rushed to the defense of the WS-50 and said his does not exhibit this problem. It’s possible I got a lemon or they addressed the issue in later revisions.
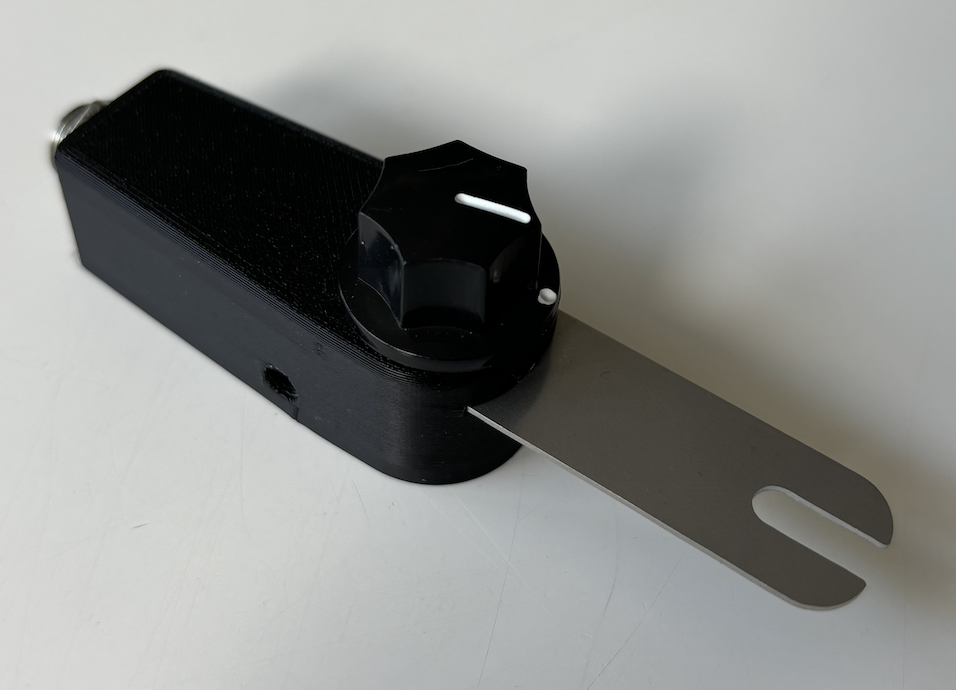
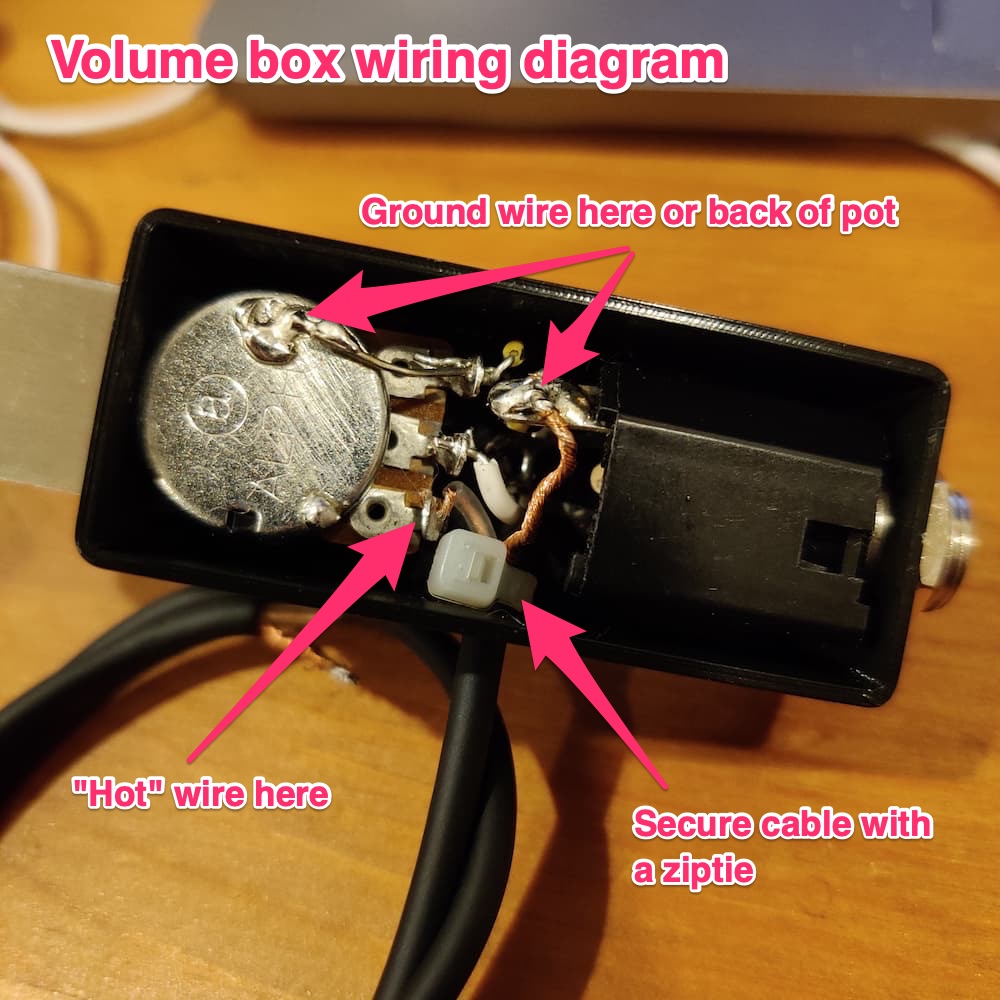
I’ve updated my volume/tone control boxes. Both have a very convenient standard 1/4″ cable output jack. No more dongle hell!
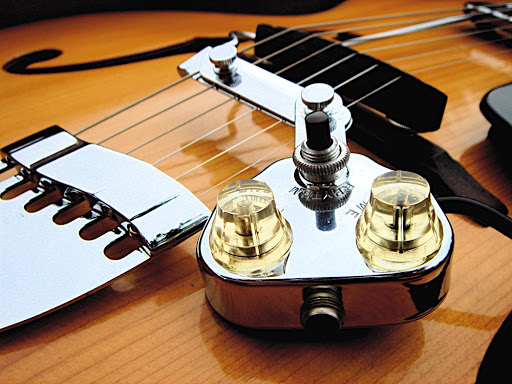
Volume/Tone control box
The design now more closely resembles the original DeArmond Rhythm Chief boxes, with the omission of the “Rhythm” toggle button. To be honest, I’ve had ones with this button and I’m not really sure what it does. If it changes the sound, the effect is VERY subtle, though maybe mine was broken. Do comment if you know.
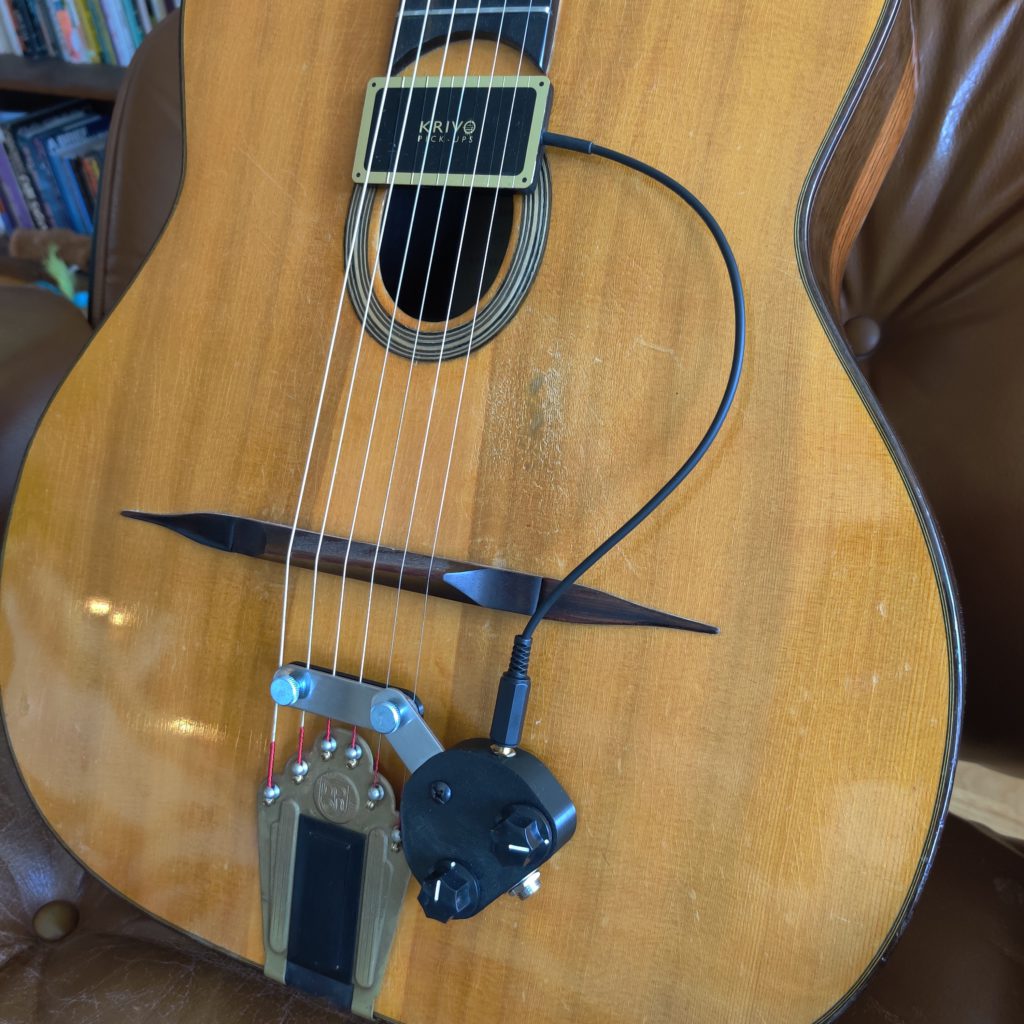
I can make them with a 1/8″ input jack for the pickup too, in case you want to add a plug to your pickup and make it detachable. Otherwise, you need to solder the cable directly from the pickup yourself. See picture below for an example using a Krivo pickup:
Note: this is not a super-easy soldering job. There are tight clearances and tricky angles. If you’re not experienced with this kind of work, you may want to seek an expert to help.
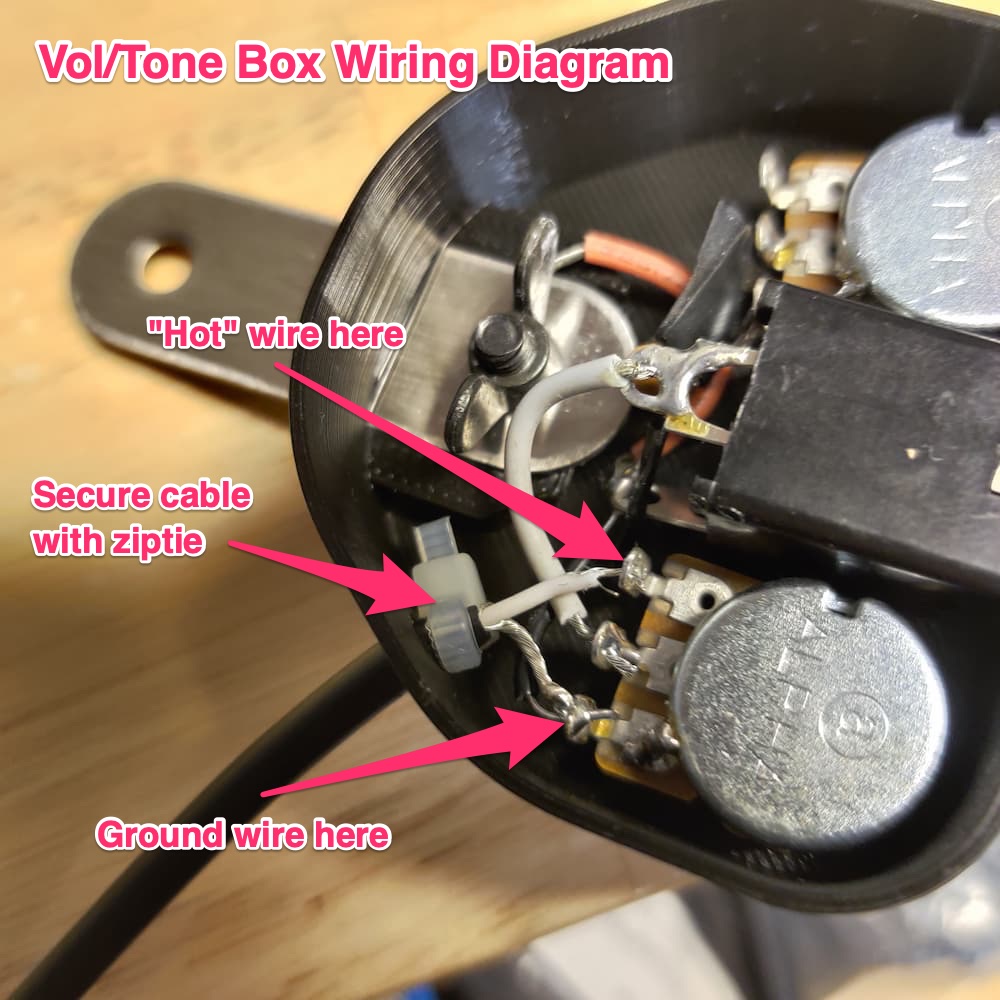
Pry the panel under the box off with a flathead screwdriver.
Strip about 3/4″ off the end of your pickup’s cable and separate the hot and ground wires. The ground wire is either the shielding wire woven around the middle hot wire, or it will be colored black.
Thread the pickup cable through the hole on the side of the unit
Solder the pickup to the correct terminals:
Tone/Volume box: You’ll be soldering to the closest potentiometer from the hole. Solder the hot wire to the furthest terminal on this pot (the same one as the capacitor), and the ground wire to the closest terminal. Do not solder anything to the middle terminal.
Volume-only box: Solder the hot wire to the closest terminal on this pot, and the ground wire to the furthest terminal. You can also solder the ground wire to the metal back of the potentiometer, whichever is easier.
Secure a ziptie tightly around the cable on the interior-side of the unit and cut off the extra tail of the ziptie. This will prevent the cable from putting strain on the solder joints when pulled.
Put the panel back on and press around the perimeter to snap it into place. (If it has trouble staying, you can also put a dab of glue on the black input jack housing to keep it in place.
If you’re here you probably just acquired an earlier vintage DeArmond Rhythm Chief (RC1000 or RC1100) archtop guitar pickup, got all excited to plug it in, then looked at the volume/tone control box thought, “huh? what the heck is this weird screwy connector?”
Well I’ll tell you what that is: it’s a very antiquated microphone jack that isn’t really around anymore.
To save you some time, if you want an adapter cable that converts this to a standard 1/4″ output jack, I sell them! Right here.
But if you want to make one yourself, the part number is Switchcraft 5501FX, and you can get them at Mouser, Digikey, or Angela Instruments. You could supply your own guitar cable, chop off one end, and attach this instead. Done.
Well, actually it’s not that simple. It’s a very unconventional connector and not really a “unscrew some stuff, then solder two contacts” sort of affair. But I’ll get to how to install one of those in a bit.
Another option is to just buy the whole dang cable. Archtop.com has them here…. for $49 + shipping. And I see them on Reverb for more or less the same.
Sure, if you’re a busy multi-thousandaire you will probably think nothing of snapping one up, but chances are that you’re a dumpster-diving jazz guitarist wondering if there’s an alternative.
So is there a cheapskate, DIY, stuff-around-the-house solution? Well, as it turns out… yes there is.
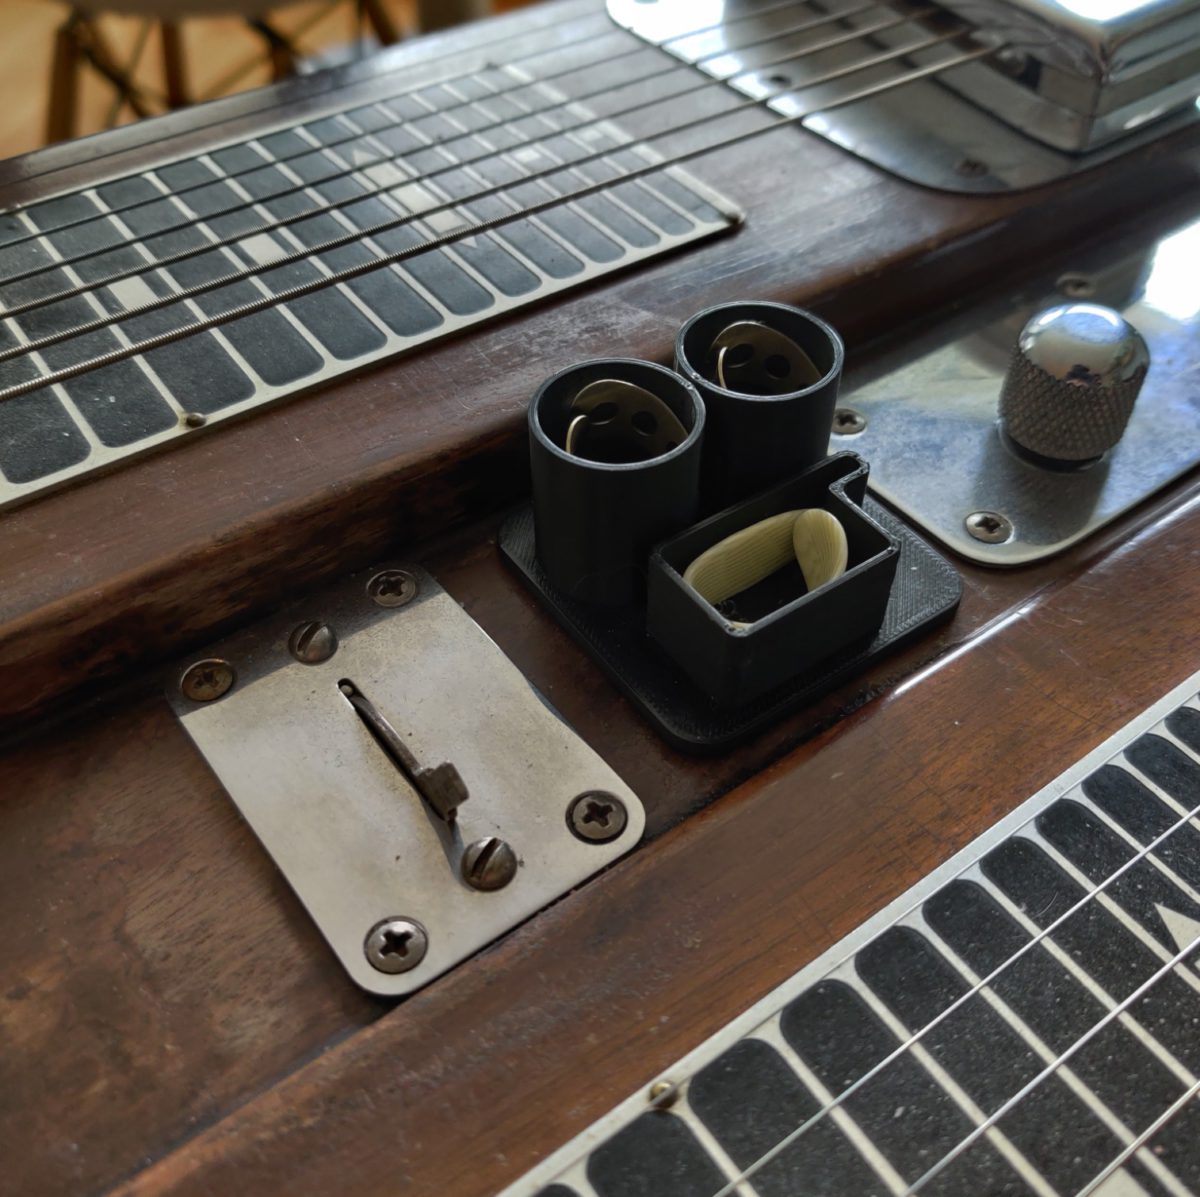
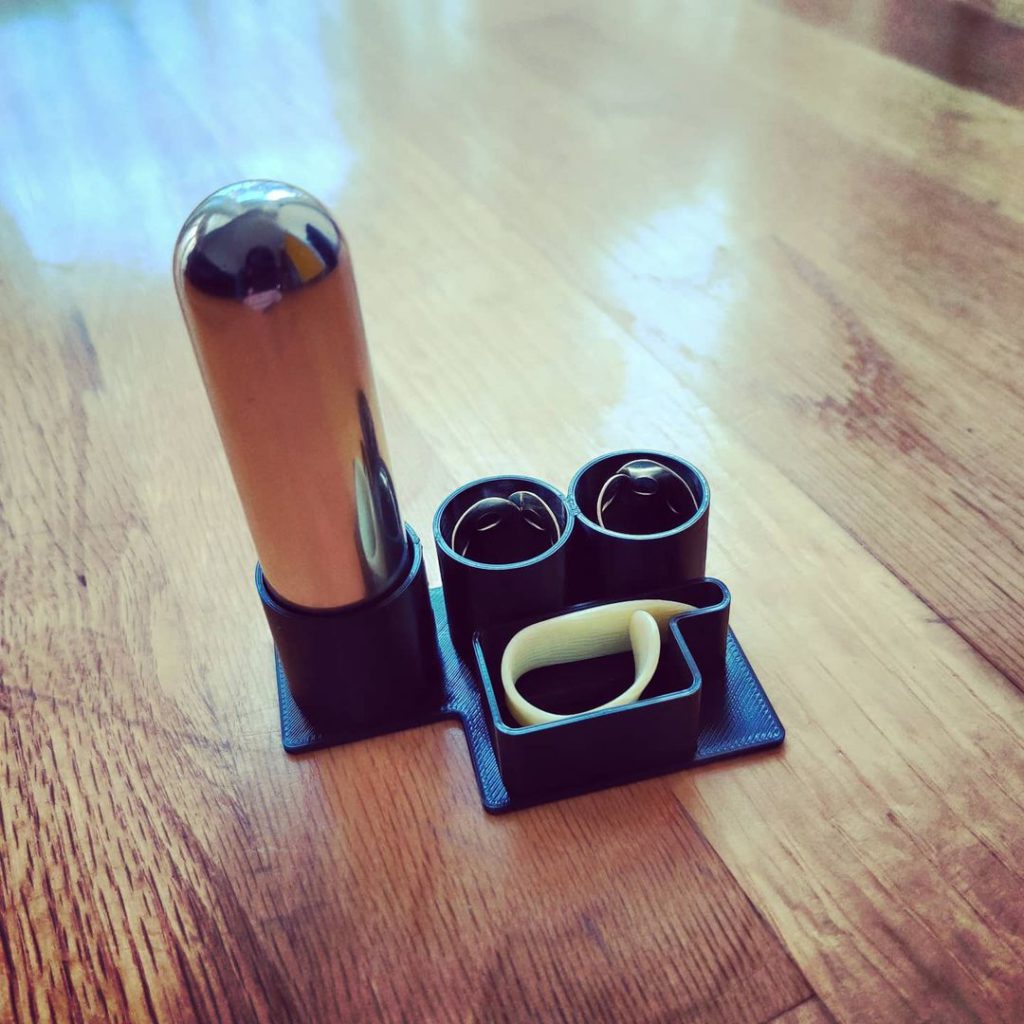
So I originally designed this to keep my cat from knocking all my steel guitar picks and bar onto the floor and batting them into her secret black hole portal… and it does a fine job of that.
But the real killer feature is I can put on all my thumb picks in one quick motion. Often the hardest part of regular practice is getting started. Less friction = more practice.
On my Fender dual pro, I have a smaller version that I stick on to the guitar with mounting putty, which helps me get ready to play in no time at all. The bar can just rest in the tuner pan, as has been the way for generations before me.